Now that we already know how to create a task it’s time to go a little further and create more than one task. Remember, each task needs its own TCB and Task Stack to work correctly,So, lets create two tasks with the same priority and lets check their behavior.
#include "bsp.h"

static int Stack1[128], Stack2[128];      // Task stacks
static OS_TASK  Task1,   Task2;                       // Task control blocks

void Task_Demo1( void );  //* Task routine 1
void Task_Demo2( void );  //* Task routine 2

int main( void )
{
    OS_Init();      // Initialize embOS (must be first)
    HAL_Init();
    OS_InitHW();   // Initialize Hardware for embOS

    OS_TASK_CREATE(&Task1, "HP Task1", 100, Task_Demo1, Stack1);  // creating Task1 with priority of 100
    OS_TASK_CREATE(&Task2, "HP Task2", 100, Task_Demo2, Stack2);  // creating Task2 with the same priority

    OS_Start();     // Start multitasking

    return 0u;
}


void Task_Demo1( void ){

    GPIO_InitTypeDef GPIO_InitStruct;

    __HAL_RCC_GPIOA_CLK_ENABLE( );

    GPIO_InitStruct.Mode  = GPIO_MODE_OUTPUT_PP;
    GPIO_InitStruct.Pull  = GPIO_NOPULL;
    GPIO_InitStruct.Speed = GPIO_SPEED_FREQ_HIGH;
    GPIO_InitStruct.Pin   = GPIO_PIN_5;
    HAL_GPIO_Init( GPIOA, &GPIO_InitStruct );

    for( ;; ){
        SEGGER_SYSVIEW_PrintfHost( "TASK 1\n" );
        HAL_GPIO_TogglePin( GPIOA, GPIO_PIN_5 );
        HAL_Delay(1000);
    }
}

void Task_Demo2( void ){

    GPIO_InitTypeDef GPIO_InitStruct;

    __HAL_RCC_GPIOC_CLK_ENABLE( );

    GPIO_InitStruct.Mode  = GPIO_MODE_OUTPUT_PP;
    GPIO_InitStruct.Pull  = GPIO_NOPULL;
    GPIO_InitStruct.Speed = GPIO_SPEED_FREQ_HIGH;
    GPIO_InitStruct.Pin   = GPIO_PIN_0;
    HAL_GPIO_Init( GPIOC, &GPIO_InitStruct );

    for( ;; ){
        SEGGER_SYSVIEW_PrintfHost( "TASK 2\n" );
        HAL_GPIO_TogglePin( GPIOC, GPIO_PIN_0 );
        HAL_Delay(500);
    }
}
Here we have a really simple program with just two tasks.
- In the first one we are configuring GPIOA, PIN 5 which is the led that is on our STM board.
- The second tasks is configuring GPIOC, PIN 0 which is an other led connected on that pin.
SYSTEMVIEW.
Rebuild and flash the program and run systemview.
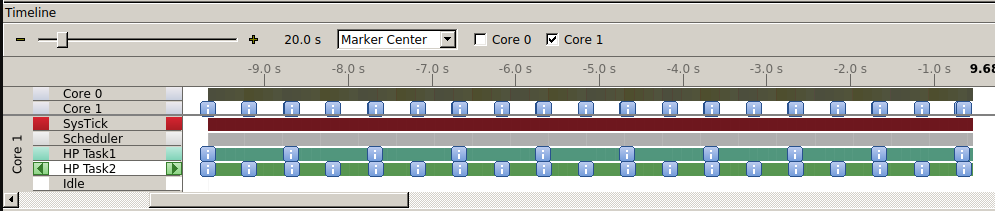
First, let's look at the entire recording on the timeline. As you can see, each blue square represents a log event, where we can see the message that appeared at that moment.
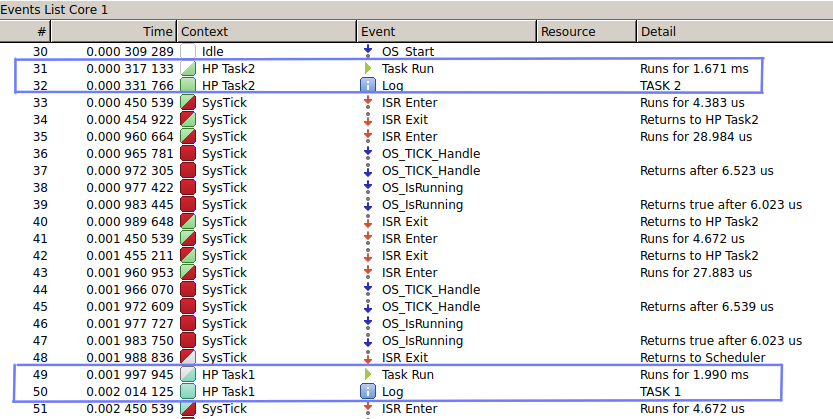
Now in the event list you can see the message each time the task is execute (each 500ms and 1000ms in this case). Let's take a closer look at how the tasks are being executed, specifically at 1 second.

As we can see, at 1 second both tasks should run so the first one in execute is the “HP Task1” and then the “HP Task2”, remember that they both have the same priority so they are cooperative tasks.