00: Using Containers for good with Zephyr
Learn how to streamline Zephyr development using Docker containers—set up the Nordic nRF54L15-DK toolchain, build, flash, and debug efficiently.
Learn how to streamline Zephyr development using Docker containers—set up the Nordic nRF54L15-DK toolchain, build, flash, and debug efficiently.
Learn how to use manifests in Zephyr to manage dependencies, set module versions, and keep projects clean. This step-by-step guide from Embedded House makes working with west.yml simple for embedded developers.
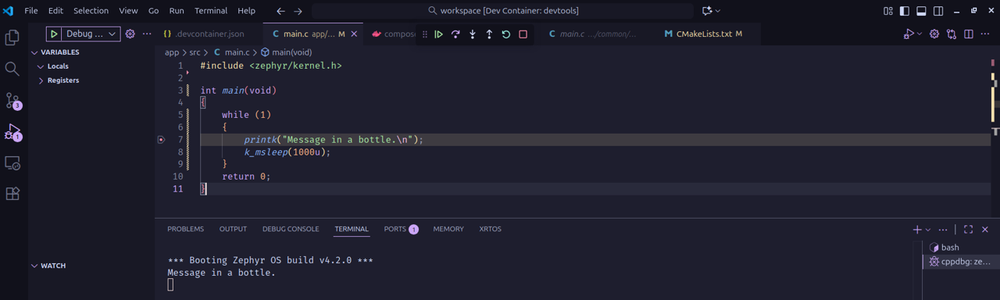
Discover how to streamline Zephyr RTOS development using dev containers with VSCode easy setup of environments, with cortex-debug plugin or segger ozone
Learn how to flash and debug STM32 microcontrollers running Zephyr OS using OpenOCD. Discover how to build a custom Docker container with ST-branded OpenOCD support for modern STM32H5 boards and integrate with VS Code for seamless debugging
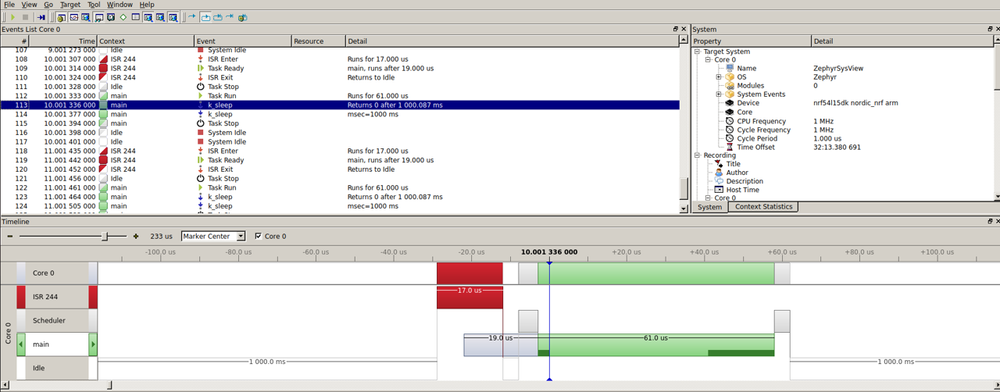
Let me show you how to set-up segger rtt to work with zephyr, and after that how to trace your task execution with systemview
You don’t need a physical board to start working with Zephyr—you can use its simulator. Nowadays, there's a growing trend toward working with virtual targets, and Zephyr is no exception. Although simulators have their limitations, they allow you to begin development long before your hardware arrives
Zephyr includes a built-in testing framework designed to help you validate and execute both unit and integration tests. Remember: ztest is the testing framework, while twister is the tool used to run the tests.
Device Tree — probably the part that can get the most complicated when you’re starting with Zephyr, and it’s something you need to dive into from the beginning, because working with microcontrollers means working with hardware and peripheral configuration.
Part I out of three where you will learn how to write your first Zephyr driver the easy and simple way, starting with binding files for a more simple and ease to use led driver
second part of write your first driver, this time we gonna see how to make your driver as a zephyr module using kconfig and cmake
In the previous two posts, we created a binding and our first software module to help us control some LEDs. Now it’s time to put both pieces together and build our own device driver — one that ties the binding and the library into a proper Zephyr device.
Probably the first peripheral you will ever use on a microcontroller is the GPIO. Working with ports and pins in Zephyr is quite straightforward. First, you need to locate the SoC device description file for your part number