FreeRTOS CLI is an extensible framework that allows the user a simple way to handle command-line input, provides a structured way to handle user inputs via a command-line interface, which can be extremely useful for various purposes such as debugging, system configuration, and user interaction with the embedded system.
The CLI framework is designed to be easily extendable by the developer, allowing the creation of commands to trigger actions instead of the system without modifying the core system.
The CLI allows Task management. It can interact with the kernel to start, stop, and monitor Tasks, which is fundamental for debugging and managing the system. The CLI can also be used to provide information about the system to the user, such as memory usage, task states, and CPU load.
To implement your own CLI in your application first need to add the next files to your source code FreeRTOS_CLI.c and FreeRTOS_CLI.h, after include the next config definition to your FreeRTOSConfig file to set the maximum size of the output buffer for command responses.
#define configCOMMAND_INT_MAX_OUTPUT_SIZE 100Now let's start with the command definition, the framework provides a structure to define each command, a brief explanation of the command, the link to the command function, and set the number of parameters expecte.
/* Configuration of the command */
static const CLI_Command_Definition_t Example_Command = {
    "Example",                                  /* Command string */
    "Example: Print a message as an example",   /* Details of command */
    Example_Command_Function,                   /* Function to execute with command */
    0                                           /* no parameters are expected */
};
Next, the command function should be created, this function will execute the logic of the command.
/* Command function */
BaseType_t Example_Command_Function(char *pcWriteBuffer, size_t xWriteBufferLen, const char *pcCommandString)
{
    strncpy( pcWriteBuffer, "Hello, this is an example command", xWriteBufferLen );    /* Copy to the output buffer the string to be printed on Terminal */
    return pdFALSE;                                                                    /* End of the command function */
}
The next step is to link the command function to the register commands. The framework provides the next API function to register the command.
FreeRTOS_CLIRegisterCommand( &Example_Command );With all the steps completed, an example command has been registered. Next, in the main.c file, the CLI task needs to be registered. The CLI requires a communication method, such as UART, which is the method chosen for this example.
#include "bsp.h"
#include <string.h>

#define MAX_INPUT_LENGTH    50              /* Max length of input command of CLI */
#define MAX_OUTPUT_LENGTH   100             /* Max length of output message from CLI */

#define UART_MSG_TIME       100             /* Max time to transmit the UART msg */
#define RESET_BUFFER        0               /* Value to clear the content of a buffer */

uint8_t RxBuffer[ MAX_INPUT_LENGTH ];       /* Buffer for message received */
uint8_t RxByte;                             /* Temporary reception character to store in RxBuffer */
__IO ITStatus stat = RESET;                 /* Flag to indicate a message has been received*/
UART_HandleTypeDef UartHandle;              /* UART handler structure*/

static const char * pcWelcomeMessage     = "\r\nCommand Line interface (CLI) on FreeRTOS.\r\nType help to view a list of registered commands.\r\n";
static const char * CommandLinePosition  = "CLI_App $ ";
static const char * NewLine              = "\r\n";

void CommandConsoleTask( void *pvParameters );   /* Task to run the CLI */

int main( void )
{
    HAL_Init();

    SEGGER_SYSVIEW_Conf( );
    SEGGER_SYSVIEW_Start( );

    /*uart configuration options for module USART2, 9600 baudrate,
    8bits, 1 stop bit, no parity, no flow control, and 8 bit lenght */
    UartHandle.Instance         = USART2;
    UartHandle.Init.BaudRate    = 9600;
    UartHandle.Init.WordLength  = UART_WORDLENGTH_8B;
    UartHandle.Init.StopBits    = UART_STOPBITS_1;
    UartHandle.Init.Parity      = UART_PARITY_NONE;
    UartHandle.Init.HwFlowCtl   = UART_HWCONTROL_NONE;
    UartHandle.Init.Mode        = UART_MODE_TX_RX;
    UartHandle.Init.OverSampling = UART_OVERSAMPLING_16;
    HAL_UART_Init( &UartHandle );                                       /*init uart2 with previous paramters*/

    HAL_UART_Receive_IT( &UartHandle, &RxByte, 1 );                     /*Set reception through interrupt of one character*/

    xTaskCreate( CommandConsoleTask, "CLI Task", 240, NULL, 2, NULL );  /* Register the CLI Task */

    vTaskStartScheduler();                                              /* Init the Kernel */
}

void CommandConsoleTask( void *pvParameters )
{
    vRegisterCLICommands();

    BaseType_t xMoreDataToFollow;                       /* Variable to know if command finished execution */

    static char pcOutputString[ MAX_OUTPUT_LENGTH ];    /* Create the Buffer to print the output message in terminal */
    HAL_UART_Transmit( &UartHandle, (const uint8_t *)pcWelcomeMessage, strlen(pcWelcomeMessage), UART_MSG_TIME );           /* Transmit the Welcome message */
    HAL_UART_Transmit( &UartHandle, (const uint8_t *)CommandLinePosition, strlen(CommandLinePosition), UART_MSG_TIME );     /* Transmit an identifier to write a new command */

    for( ;; )
    {
        if( stat == SET )                   /* Check if a command is available */
        {
            stat = RESET;                   /* Clear the Flag */
            HAL_UART_Transmit( &UartHandle, (const uint8_t *)NewLine, strlen(NewLine), UART_MSG_TIME );  /* Print a new line on terminal */

            do
            {
                xMoreDataToFollow = FreeRTOS_CLIProcessCommand((const char *)RxBuffer, pcOutputString, sizeof(pcOutputString)); /* Precess the command received */

                HAL_UART_Transmit( &UartHandle, (uint8_t *)pcOutputString, strlen(pcOutputString), UART_MSG_TIME );             /* Print the output message on terminal */
                HAL_UART_Transmit( &UartHandle, (const uint8_t *)NewLine, strlen(NewLine), UART_MSG_TIME );                     /* Print a new line on terminal */

            } while ( xMoreDataToFollow != pdFALSE );                           /* Process the same command until command return pdFalse */

            memset( RxBuffer, RESET_BUFFER, sizeof(RxBuffer) );                 /* Clear the buffer */
            memset( pcOutputString, RESET_BUFFER, sizeof(pcOutputString) );     /* Clear the buffer */

            /* Transmit an identifier to write a nex command */
            HAL_UART_Transmit( &UartHandle, (const uint8_t *)CommandLinePosition, strlen(CommandLinePosition), UART_MSG_TIME );
        }

        vTaskDelay(10/portTICK_PERIOD_MS);
    }
}

/* Callback UART interruption that process the data received to store directly in command buffer */
void HAL_UART_RxCpltCallback( UART_HandleTypeDef *huart )
{
    BaseType_t xTaskWoken = pdFALSE;
    static uint32_t i = 0;          /* Variable that indicate the index position of the command buffer */

    HAL_UART_Transmit( &UartHandle, &RxByte, 1, 100 );  /* Send to Terminal the character received */

    if( RxByte == '\r')             /* Check if enttro key is pressed */
    {
        stat = SET;                 /* Set flag to indicate reception complete */
        i = 0;                      /* Restart buffer index */
    }
    else if(RxByte == '\b')         /* Check if backspace key is pressed */
    {
        i--;                        /* Return a position */
        RxBuffer[i] = '\0';         /* Set a termiate character */
    }
    else
    {
        RxBuffer[i] = RxByte;       /* Store character in buffer */
        i++;                        /* Increase index pointer */
    }

    /*Set reception through interrupt of one character again*/
    HAL_UART_Receive_IT( &UartHandle, &RxByte, 1 );
    portEND_SWITCHING_ISR(xTaskWoken);
}
Observe that UART communication is set to receive the data from the serial port. Each data is processed by the UART interruption and stored directly in the RxBuffer, the task registered is in charge of reading this buffer to process and execute the command function linked to the command string.
The function FreeRTOS_CLIProcessCommand is in charge of processing the command string, variable xMoreDataToFollow will store the return value of each command function, if this value is equal to pdTRUE then the application will execute again the command until the command function returns a pdFALSE, it is useful when the command need to print multiples lines in terminal.
When the application starts, the terminal will display a welcome message followed by the line to enter the command.

To see the list of commands that the application accepts, execute the help command. This will display each registered command along with a brief explanation.
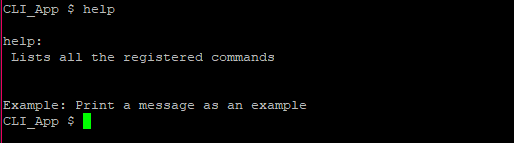
Next, let’s run the Example command that is registered in the application. Typing Example, the function will execute and print a message on the terminal, confirming the command was successfully executed.

Code Snippets
- CLI: Simple commands to an LED control
- CLI: Recursive command to control a series of LEDs
- CLI: Command with parameters to control the state of an LED
Exercises (print)
- Create a CLI application using the info provided, and write your own commands to print messages on the terminal.
- Create a CLI application to be used with another task, this task will be in charge of changing the content of the message that going to be printed on the terminal. Use a CLI command to print the message modified by the created task.
- Create an application to use parameters, and implement a new command that expects 1 parameter, this parameter will be printed when the command executes.
- Modify the last exercise and now add another parameter. now parameter 1 will be used to set the increment count, and the second parameter to indicate if the message should be printed on the terminal. Parameter 1 can accept numbers between 1 - 9, parameter 2 should accept only a string, (A) to activate the message on the terminal, (D) to deactivate the message on the terminal. The message to print is the number incremented.
- Create a new application to add a recursive command execution to print each time a different message. Stop the recursive command before the third message is printed.
Exercises
- Create a simple CLI application without parameters, configure a command to switch the state of an LED, and print the current state of the LED on the terminal.
- Modify the Example Recursive command to add parameters to the application, deleting a command and using just the arguments to control the same but now with a command. Delete the command
SerieOffand implement arguments to control now theSerieOnandSerieOffactions with a parameter. - Modify the first exercise, now application should be able to control a series of LEDs, using 2 parameters, the first parameter is used to choose a pin, and the second is in charge of setting a high value or low value in the pin.
- Modify the last exercise and add a command just to obtain information about the pin state of each LED. Create a command
InfoLEDsto print each pin state using the recursive command. - Create a CLI application, and create a command that expects a string parameter to be printed in the terminal. Use a command function that reads the parameter, to after be sent using a message buffer to another task in charge of printing the message in the terminal. The String must be sent by the command to the task
PrintMsgTask, task will be unblocked when the string is received. Take a look at Stream and messages buffer.