If you have ever worked with an operating system like FreeRTOS, you will know that when we refer to tasks, we are basically talking about functions, which are implemented in C, accept a void pointer as a parameter, do not return any value, and are normally executed within an infinite loop. Well, this time we are going to talk about embOS which is the RTOS from SEGGER company. This new RTOS has been developed, enhanced and optimized for minimal memory consumption in both RAM and ROM which makes it perfect for limited resources microcontrollers.
Creating tasks in embOS.
Tasks are very important when we are using an operating system and embOS is not an exception, but there are some important things that we have to keep in mind to create and execute a task successfully. First of all we have to create our Task Control Block (TCB) and Task Stack which are the bases of the task.
- Task Control Block (TCB): This is basically a control structure for the task where elements like stack pointer, priority, etc. are stored and it’s created with “OS_TASK” type definition.
static OS_TASK TaskCB; // Task control block- Task Stack: This is where task’s temporal data is store when the task in running state change, so, we need one stack for each task. The Task Stack is declared with the following form:
static OS_STACKPTR int Stack[128]; // where OS_STACKPTR is an empty defineOnce we have our respective TCB and Task Stack it’s time to create our task. embOS offers two different functions to create a task depending on what kind of task we need.
- OS_TASK_Create(): This function is for tasks that won’t accept any parameter.
void  OS_TASK_Create  (
  OS_TASK* pTask,                   /* Pointer to a task control block of type OS_TASK. */
  OS_ROM_DATA const char* sName,    /* Pointer to the name of the task. */
  OS_PRIO Priority,                 /* Priority of the task. (Higher values indicate higher priorities) */
  OS_ROUTINE_VOID*  pfRoutine,      /* Pointer to our task function. */
  void OS_STACKPTR* pStack,         /* Pointer to our task stack. */
  OS_UINT StackSize,                /* Size of stack in bytes. */
  OS_UINT TimeSlice                 /* Time slice value for round-robin scheduling. (Has an effect only if other tasks are running at the same priority) */
);- OS_TASK_CreateEx(): This function is for tasks that will accept a void pointer as parameter.
void  OS_TASK_CreateEx  (
  OS_TASK* pTask,                 /* Pointer to a task control block of type OS_TASK. */
  OS_ROM_DATA const char* sName,  /* Pointer to the name of the task. */
  OS_PRIO Priority,               /* Priority of the task. (Higher values indicate higher priorities) */
  OS_ROUTINE_VOID_PTR* pfRoutine, /* Pointer to our task function. */
  void OS_STACKPTR* pStack,       /* Pointer to our task stack. */
  OS_UINT StackSize,              /* Size of stack in bytes. */
  OS_UINT TimeSlice,              /* Time slice value for round-robin scheduling. (Has an effect only if other tasks are running at the same priority) */
  void* pContext                  /* Parameter passed to the created task. */
);
Another thing I should say is that tasks should not return any value and should be implemented as an endless loop:
void Task1(void)
{
    /*init here*/
    for(;;)
    {
        /*your code here*/
    }
}
or it must terminate itself:
void Task2(void)
{
    /*init here*/

    do
    {
        DoSomeMore = DoSomethingElse();  // Do something
        OS_TASK_Delay(10);               // Give other tasks a chance to run
    } while (DoSomeMore);

    OS_TASK_Terminate(NULL);           // Terminate this task
}
embOS offers us macros for creating tasks, which makes things easier and is more than sufficient in most cases.
- OS_TASK_CREATE(): It’s still been for tasks that won't accept any parameter the difference between the macro and the function is that some of the parameters are already given.
#define OS_TASK_CREATE(pTask, sName, Priority, pfRoutine, pStack) OS_TASK_Create ((pTask), (sName), (OS_PRIO)(Priority), (pfRoutine), (void OS_STACKPTR*)(pStack), sizeof(pStack), 2u)Where the parameters that are passed in the original function are “StackSize" and “TimeSlice".
- OS_TASK_CREATEEX(): It’s still been for tasks that will accept a void pointer as parameter, the difference between the macro and the function it’s the same that the previous function
#define OS_TASK_CREATEEX(pTask, sName, Priority, pfRoutine, pStack, pContext) OS_TASK_CreateEx ((pTask), (sName), (OS_PRIO)(Priority), (pfRoutine), (void OS_STACKPTR*)(pStack), sizeof(pStack), 2u, (pContext))As you can see, the parameters that are passed in the original function are “StackSize" and “TimeSlice".
Once we have all of this in mind, we can proceed with the creation of a little example of how a simple task is implemented.
#include "bsp.h"

static int Stack[128];  // Task stack
static OS_TASK  TaskCB;             // Task control block

void Task_Demo( void ); /* Task function that not accept a parameter */

int main( void )
{
    OS_Init();      // Initialize embOS (must be first)
    HAL_Init();     // Initialize the HAL drivers
    OS_InitHW();    // Initialize Hardware for embOS

    OS_TASK_CREATE(&TaskCB, "HP Task", 100, Task_Demo, Stack); /* Creation of a task with the macro */

    OS_Start();     // Start multitasking

    return 0u;
}

void Task_Demo( void )
{
    GPIO_InitTypeDef GPIO_InitStruct;

    __HAL_RCC_GPIOA_CLK_ENABLE( );

    GPIO_InitStruct.Mode  = GPIO_MODE_OUTPUT_PP;
    GPIO_InitStruct.Pull  = GPIO_NOPULL;
    GPIO_InitStruct.Speed = GPIO_SPEED_FREQ_HIGH;
    GPIO_InitStruct.Pin   = GPIO_PIN_5;
    HAL_GPIO_Init( GPIOA, &GPIO_InitStruct );

    for( ;; )
    {
        SEGGER_SYSVIEW_PrintfHost( "Hello world\n" );
        HAL_GPIO_TogglePin( GPIOA, GPIO_PIN_5 );
        HAL_Delay( 1000u );
    }
}
Systemview
It's time to see the program's behavior in real time. So, lets build and flash the previous program and run systemview.
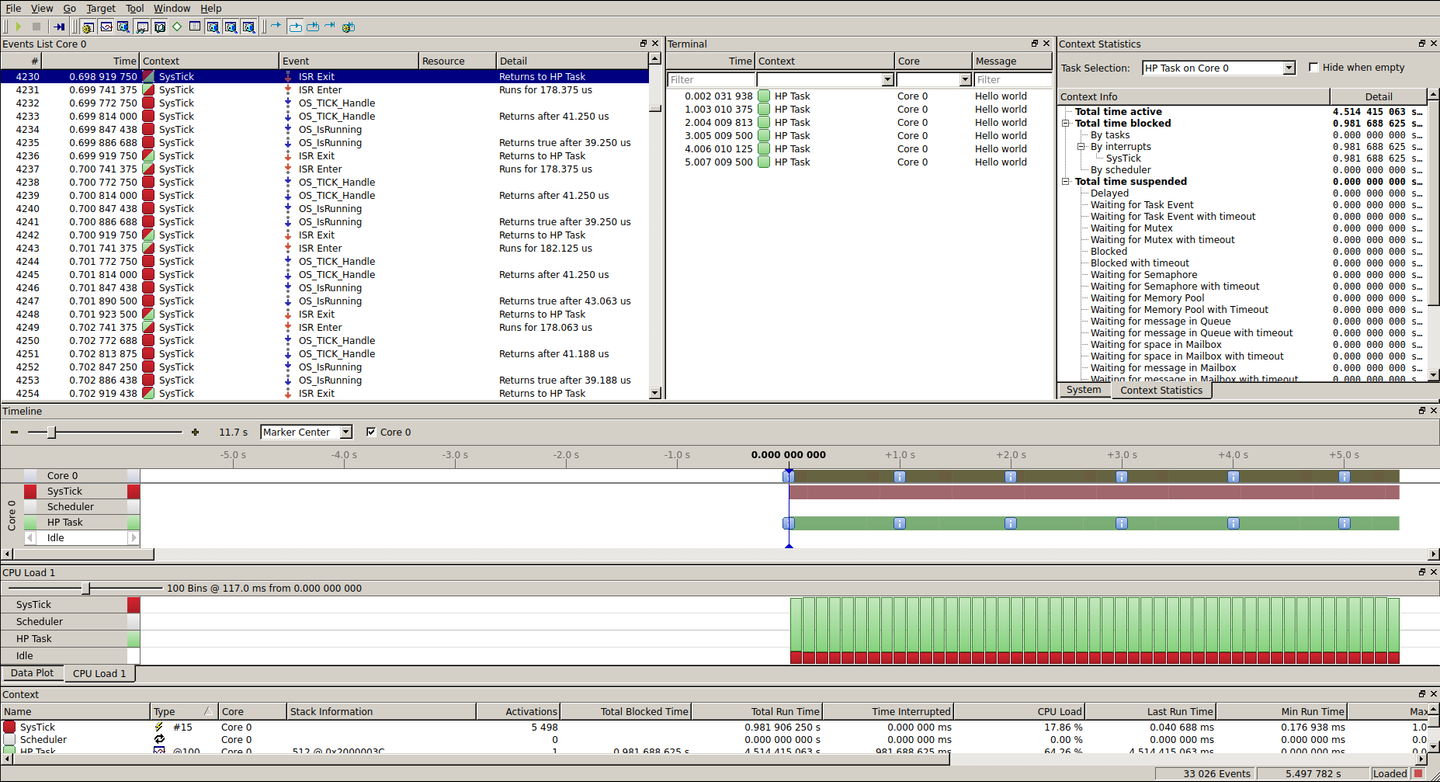
After making the recording, in “Terminal” window we can notice the messages the task is printing every second and on the timeline we can see the exact moment the message was displayed.
Task Functions
void OS_TASK_AddContextExtension(OS_EXTEND_TASK_CONTEXT_LINK* pExtendContextLink, OS_CONST_PTR OS_EXTEND_TASK_CONTEXT *pExtendContext);
void OS_TASK_AddTerminateHook( OS_ON_TERMINATE_HOOK* pHook, OS_ROUTINE_TASK_PTR*  pfRoutine );
void OS_TASK_Create( OS_TASK* pTask, const char*  sName, OS_TASK_PRIO Priority, OS_ROUTINE_VOID* pfRoutine, void OS_STACKPTR *pStack, OS_UINT StackSize, OS_UINT TimeSlice );
void OS_TASK_CreateEx( OS_TASK* pTask, const char* sName, OS_TASK_PRIO Priority, OS_ROUTINE_VOID_PTR* pfRoutine, void OS_STACKPTR *pStack, OS_UINT StackSize, OS_UINT TimeSlice, void* pContext );
void OS_TASK_Delay( OS_TIME t );
void OS_TASK_Delay_us( OS_TIME t );
void OS_TASK_DelayUntil( OS_U16 us );
OS_TASK *OS_TASK_GetID( void );
char *OS_TASK_GetName( OS_CONST_PTR OS_TASK *pTask );
int OS_TASK_GetNumTasks( void );
OS_TASK_PRIO OS_TASK_GetPriority( OS_CONST_PTR OS_TASK *pTask );
OS_TASK_STATUS OS_TASK_GetStatus( OS_CONST_PTR OS_TASK *pTask );
OS_U8 OS_TASK_GetSuspendCnt( OS_CONST_PTR OS_TASK *pTask );
OS_U8 OS_TASK_GetTimeSliceRem( OS_CONST_PTR OS_TASK *pTask );
OS_BOOL OS_TASK_IsTask( OS_CONST_PTR OS_TASK *pTask );
OS_TASK *OS_TASK_Index2Ptr( int TaskIndex );
void OS_TASK_RemoveAllTerminateHooks( void );
void OS_TASK_RemoveTerminateHook( OS_CONST_PTR OS_ON_TERMINATE_HOOK *pHook );
void OS_TASK_Resume( OS_TASK* pTask );
void OS_TASK_ResumeAll( void );
void OS_TASK_SetContextExtension( OS_CONST_PTR OS_EXTEND_TASK_CONTEXT *pExtendContext );
void OS_TASK_SetDefaultContextExtension( OS_CONST_PTR OS_EXTEND_TASK_CONTEXT *pExtendContext );
void OS_TASK_SetDefaultStartHook( OS_ROUTINE_VOID* pfRoutine );
void OS_TASK_SetInitialSuspendCnt( OS_U8 SuspendCnt );
void OS_TASK_SetName( OS_TASK* pTask, const char* sName );
void OS_TASK_SetPriority( OS_TASK* pTask, OS_TASK_PRIO Priority );
OS_U8 OS_TASK_SetTimeSlice( OS_TASK* pTask, OS_U8 TimeSlice );
void OS_TASK_Suspend( OS_TASK* pTask );
void OS_TASK_SuspendAll( void );
void OS_TASK_Terminate( OS_TASK* pTask );
void OS_TASK_Wake( OS_TASK* pTask );
void OS_TASK_Yield( void );
Snippets
- TASKS: Tasks with equal priorities
- TASKS: Tasks with different priorities
- TASKS: Tasks that reuse a function
- TASKS: Extending the task context
Exercises (Printf)
- Through a for loop, create 5 tasks using only a simple function “Task template“. Use the parameters function in each task to display a different message. How many Tasks can be created? What are the limitations? Remember that the function
OS_TASK_CreateEx()help us to pass a parameter (context) to our tasks, even if you want to go further you can extend the task context through your own structure. - Write a program that use 3 tasks, each one should send a different message at different times, 1sec, 2sec, and 3sec respectively. Use the function
OS_TASK_Delay(), for each one. - From the last exercise, modify the time of the tick interrupt to be generated each 10ms. The program should continue with the same function, displaying the 3 messages in the times previously required.
- Create 2 tasks to count from 1 to 20, the first task should run each second and will count from 1 to 10, and the second task will continue the count each 3 seconds from 10 to 20. Delete and create tasks for this purpose.
- Investigate the functions OS_TASK_GetID(), OS_TASK_GetStatus(), OS_TASK_GetTimeSliceRem(), y OS_TASK_Yield().
Exercises
- Write a task that rotates a turned-off LED on port C at a speed that is perceptible to the human eye and a second task to blink the Nucleo on board led every 500ms.
- Write a program that turns on an LED when a button is pressed and turns it off when the button is released. (The LED will only turn on when the button is pressed.), use a task to read the button a a second task to control the led state, a global variable shall be used to communicate both tasks
- Write a program that rotates a LED on port C, but this time with three speeds and three buttons. Each button will activate a different speed. again one task will control the buttons an second task the leds and a global variable to communicate both tasks
- Modify exercise 2 so that pressing the button once turns on the LED, and pressing it again turns it off.
- Repeat exercise 3, but this time using only one button and four speeds. Each time the button is pressed, the speed will increase, and when it reaches the last speed, it will start over.
- Modify the previous program using two buttons. Pressing one button will rotate the LEDs from left to right, and pressing the other button will rotate them from right to left.