First things first, I'm going to show you how to incorporate embOS into your project. In my case, I'm going to use our already famous project template for the for the Nucleo-G0B1RE board as starting point. If you're using a different STM32 board, you can follow the guide described in here to organize your project in a similar fashion and follow from there this guide.
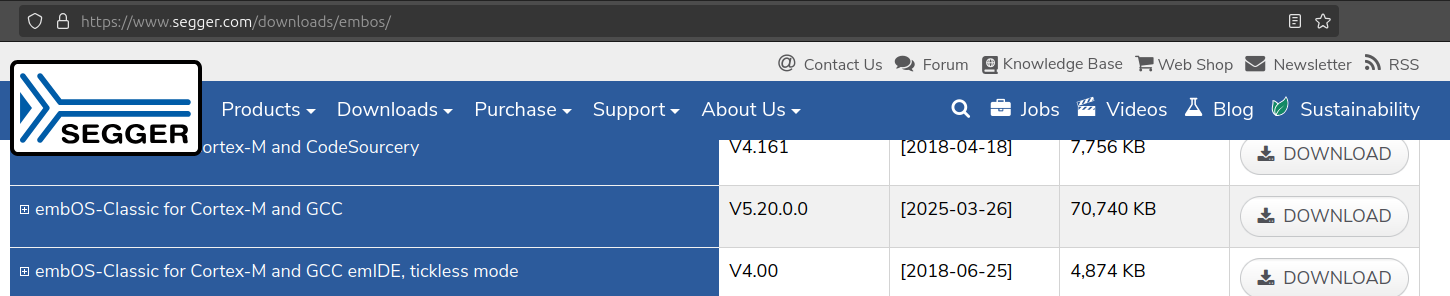
Download the latest version of SEGGER embOS Classic for Cortex-M and GCC from the official SEGGER website and unzip the zip file.
You should find the following folder structure and documents
embOS_Classic_CortexM_GCC_Obj_SFL_V5.20.0.0
├── embOSView
├── Start
├── License.txt
├── Release_embOS.html
├── Release_embOS_Classic_CortexM_GCC.html
├── SYSVIEW_embOS.txt
├── UM01001_embOS.pdf
└── UM01039_embOS_Classic_CortexM_GCC.pdf
Locate the following directories
embOS_Classic_CortexM_GCC_Obj_SFL_V5.20.0.0/Start/Inc
embOS_Classic_CortexM_GCC_Obj_SFL_V5.20.0.0/Start/Lib
Copy and paste the Inc and Lib folders into the directory you created in the root of your project. Also create the Src sub-directory. You should have the following order:
template-g0
├── app
├── cmsisg0
├── halg0
├── embOS
│   ├── Inc
│   ├── Lib
│   └── Src
├── linker.ld
├── makefile
├── misra.json
...
Inside the Inc folder, just delete the files BSP.h and BSP_UART.h because we will not use these files. Inside the Lib folder, you'll find different files, we’ll only include the libraries our microcontroller needs. To find out which files we'll use, follow the table below.
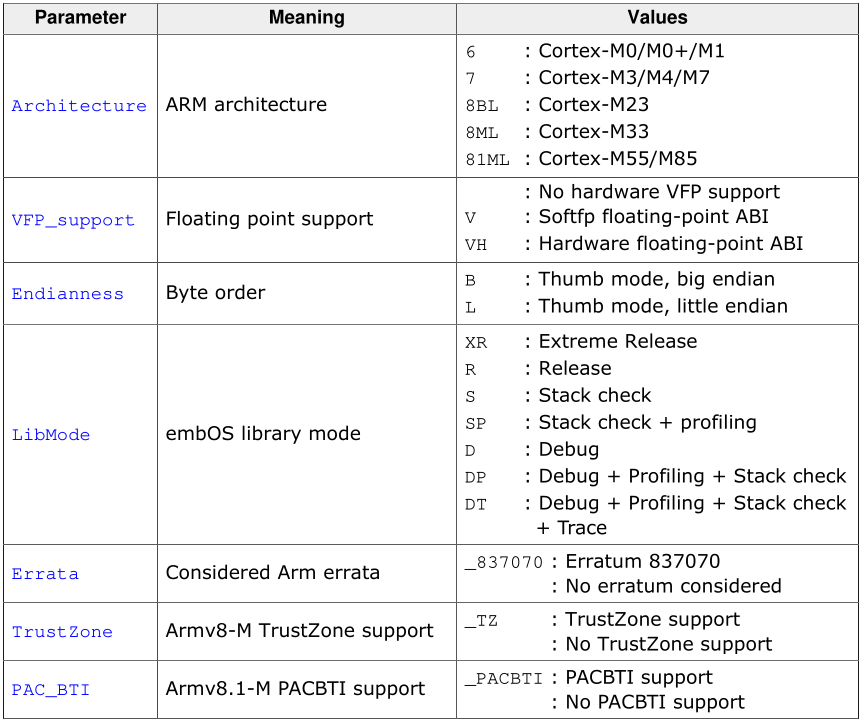
To choose the correct files for our microcontroller we have to know the libraries are named as:
libosT<Architecture><VFP><Endianness><LibMode><Errata><TrustZone><PACBTI>.aAs you can see, the libraries I’m gonna use are those with the nomenclature libosT6Lxx.a because the architecture value 6 is for Cortex-M0/M0+/M1 (Cortex-M0+ in my case) and the byte order is little endian. Remember, you have to use the files according with your microcontroller arquitecture.
template-g0
├── app
├── cmsisg0
├── halg0
├── embOS
│   ├── Inc
│   ├── Lib
│   │   ├── libosT6LD.a
│   │   ├── libosT6LDP.a
│   │   ├── libosT6LDT.a
│   │   ├── libosT6LR.a
│   │   ├── libosT6LS.a
│   │   ├── libosT6LSP.a
│   │   └── libosT6LXR.a
│   └── Src
...
We need some extra files we have to copy from the BoardSupport directory, or more specifically from the corresponding board you are using in my case the Nucleo-STM32G0B1RE. From here copy the source files embOS use to work correctly. From the Setup folder copy the files below and paste these files into the Src folder you created in your project folder.
embOS_Classic_CortexM_GCC_Obj_SFL_V5.20.0.0/Start/BoardSupport/ST/STM32G0B1_STM32G0B1RE_Nucleo/Setup/RTOSInit_STM32G0xx.c
embOS_Classic_CortexM_GCC_Obj_SFL_V5.20.0.0/Start/BoardSupport/ST/STM32G0B1_STM32G0B1RE_Nucleo/Setup/OS_Error.c
embOS_Classic_CortexM_GCC_Obj_SFL_V5.20.0.0/Start/BoardSupport/ST/STM32G0B1_STM32G0B1RE_Nucleo/Setup/JLINKMEM_Process.c
embOS_Classic_CortexM_GCC_Obj_SFL_V5.20.0.0/Start/BoardSupport/ST/STM32G0B1_STM32G0B1RE_Nucleo/Setup/OS_ThreadSafe.c
We need to modify a few things in the file RTOSInit_STM32G0xx.c starting by comment the #include "SEGGER_SYSVIEW.h" we are not going to use it at the moment. And then in function OS_InitHW remove several lines to leave the function only with the lines below; the HAL library already init the Systick timer.
void OS_InitHW(void) {
   OS_INT_IncDI();
  // Inform embOS about the timer settings
  OS_SYSTIMER_CONFIG SysTimerConfig = {OS_TIMER_FREQ, OS_INT_FREQ, OS_TIMER_DOWNCOUNTING, _OS_GetHWTimerCycles, _OS_GetHWTimer_IntPending};
  OS_TIME_ConfigSysTimer(&SysTimerConfig);
  // Configure and initialize SEGGER SystemView
#if (OS_SUPPORT_TRACE_API != 0)
  SEGGER_SYSVIEW_Conf();
#endif
  // Initialize communication for embOSView
#if (OS_VIEW_IFSELECT == OS_VIEW_IF_JLINK)
  JLINKMEM_SetpfOnRx(OS_COM_OnRx);
  JLINKMEM_SetpfOnTx(OS_COM_OnTx);
  JLINKMEM_SetpfGetNextChar(OS_COM_GetNextChar);
#elif (OS_VIEW_IFSELECT == OS_VIEW_IF_UART)
  BSP_UART_Init(OS_UART, OS_BAUDRATE, BSP_UART_DATA_BITS_8, BSP_UART_PARITY_NONE, BSP_UART_STOP_BITS_1);
  BSP_UART_SetReadCallback(OS_UART, _OS_OnRX);
  BSP_UART_SetWriteCallback(OS_UART, _OS_OnTX);
#endif
  OS_INT_DecRI();
}
The you rename the SysTick_Handler()function in the same file, to HAL_SYSTICK_Callback() to avoid problems with the fucntion in the ints.c file.
void HAL_SYSTICK_Callback(void);
void HAL_SYSTICK_Callback(void) {
#if (OS_SUPPORT_TRACE_API != 0)
  if (SEGGER_SYSVIEW_DWT_IS_ENABLED() == 0u) {
    SEGGER_SYSVIEW_TickCnt++;
  }
#endif
In file ints.c we need to comment (or remove) the functions SVC_Handlerand PendSV_Handler since this are used by embOS and add the call to HAL_SYSTICK_IRQHandler that in turn will call HAL_SYSTICK_Callbac, this is how for the moment we serve the main interrupt our operative system needs
void SysTick_Handler( void ){
    /* service HAL library tick */
    HAL_IncTick( );
    /* service embOS rick*/
    HAL_SYSTICK_IRQHandler( );
}
In the make file we need to add the files to compile and also the directories with our new files are located, sources and headers
# Files to compile
SRCS += OS_Error.c JLINKMEM_Process.c RTOSInit_STM32G0xx.c OS_ThreadSafe.c
...

# directories with source files to compiler
SRC_PATHS += embOS/Src
...

# directories with header files
INC_PATHS += embOS/Inc
...
You also need to add the precompiled rtos library, as you may notice we are using an Friendly license version and the embOS source code is not shipped, and there is another detail we can only use some of the library versions with debug options, nothing with release options. You need to add the corresponding library and its corresponding define symbol
# library file
LIBF = osT6LD
...

# Global symbols (#defines)
SYMBOLS = -DSTM32G0B1xx -DUSE_HAL_DRIVER -DOS_LIBMODE_D
...
embOS expects specific symbols in order to retrieve information about stack and heap in your project: __heap_end__, __heap_start__, __stack_end__ and __stack_start__ These symbols need to be added in the ._user_heap_stack section in the linker file as shown below:
._user_heap_stack :
  {
    . = ALIGN(8);
    PROVIDE ( end = . );
    PROVIDE ( _end = . );
    __heap_start__ = .;
    . = . + _Min_Heap_Size;
    . = ALIGN(8);
    __heap_end__ = .;
    __stack_start__ = .;
    . = . + _Min_Stack_Size;
    . = ALIGN(8);
    __stack_end__ = .;
  } >RAM
To test the operative system is working correctly let create a simple task with a running blinky led, using the code down below
#include "bsp.h"
#include "RTOS.h"

static OS_STACKPTR int Stack[128];      // Task stacks
static OS_TASK  Task;                   // Task control blocks

void Task_Demo( void );  //* Task routine

int main( void )
{
    OS_Init();      // Initialize embOS (must be first)
    HAL_Init();
    OS_InitHW();   // Initialize Hardware for embOS

    // create a Task with priority of 100 and time slice of 1ms
    OS_TASK_Create(&Task1, "HP Task", 100, Task_Demo, Stack, sizeof(pStack), 1u);

    OS_Start();     // Start multitasking

    return 0u;
}

void Task_Demo( void ){

    GPIO_InitTypeDef GPIO_InitStruct;
    __HAL_RCC_GPIOA_CLK_ENABLE( );

    GPIO_InitStruct.Mode  = GPIO_MODE_OUTPUT_PP;
    GPIO_InitStruct.Pull  = GPIO_NOPULL;
    GPIO_InitStruct.Speed = GPIO_SPEED_FREQ_HIGH;
    GPIO_InitStruct.Pin   = GPIO_PIN_5;
    HAL_GPIO_Init( GPIOA, &GPIO_InitStruct );

    for( ;; ){
        HAL_GPIO_TogglePin( GPIOA, GPIO_PIN_5 );
        HAL_Delay(1000);
    }
}
Including SystemView
Since we are using the SEGGER RTOS, it is a good idea to make use of the real-time recording and visualization tool made by segger to analyze the behavior of our project. Yes, it’s time to include SystemView to our project. Download SystemView from the official SEGGER website. Just remember you only be able to use systemview if you are debugging with a J-Link probe

Once unzip the archive you should see the following folder structure.
SystemView_Src_V360d
├── Config
├── Sample
└── SEGGER
Let’s create a new SystemView directory in the root of our project and the Inc and Src sub-directories. Locate the following files from the source files and copy them to the Inc folder.
SystemView_Src_V360d/Config/SEGGER_RTT_Conf.h
SystemView_Src_V360d/Config/SEGGER_SYSVIEW_Conf.h
SystemView_Src_V360d/SEGGER/*all .h files*
SystemView_Src_V360d/Sample/embOS/SEGGER_SYSVIEW_embOS.h
Locate the following files and copy them to the Src folder.
SystemView_Src_V360d/Sample/embOS/SEGGER_SYSVIEW_embOS.c
SystemView_Src_V360d/SEGGER/*all .c .S files*
SystemView_Src_V360d/SEGGER/Syscalls/SEGGER_RTT_Syscalls_GCC.c
For the last .c file we have to consider the target we are using (Cortex-M0+ in my case). So in my particular case I’m gonna locate the files for cortex-M0 but you use the files according to your type of target.
SystemView_Src_V360d/Sample/embOS/Config/Cortex-M0/SEGGER_SYSVIEW_Config_embOS_CM0.cThe Project SystemView directory should look like this:
SystemView/
├── Inc
│   ├── SEGGER_RTT_Conf.h
│   ├── SEGGER_RTT.h
│   ├── SEGGER_SYSVIEW_Conf.h
│   ├── SEGGER_SYSVIEW_ConfDefaults.h
│   ├── SEGGER_SYSVIEW_embOS.h
│   ├── SEGGER_SYSVIEW_Int.h
│   ├── SEGGER_SYSVIEW.h
│   └── SEGGER.h
└── Src
    ├── SEGGER_RTT_printf.c
    ├── SEGGER_RTT.c
    ├── SEGGER_SYSVIEW_Config_embOS_CM0.c
    ├── SEGGER_SYSVIEW_embOS.c
    ├── SEGGER_RTT_ASM_ARMv7M.S
    └── SEGGER_SYSVIEW.c
Okay, We’ve already add the necessary files to use SystemView in our project, but there is still one step. Let’s modify our make file to add the new files to compile. For none M0/M0+ devices you also need to add SEGGER_RTT_ASM_ARMv7M.S file
# Files to compile
SRCS += SEGGER_RTT.c SEGGER_RTT_printf.c SEGGER_SYSVIEW.c SEGGER_SYSVIEW_embOS.c SEGGER_SYSVIEW_Config_embOS_CM0.c
...

# directories with source files to compiler
SRC_PATHS += SystemView/Src
...

# directories with header files
INC_PATHS += SystemView/Inc
...
Don't forget make sure to uncomment the #include "SEGGER_SYSVIEW.h" to start using SystemView functions in the file RTOSInit_STM32G0xx.c .
Let’s modify the file SEGGER_SYSVIEW_Conf.h in order to add some defines we need to run SystemView. By default SystemView use the the defines located in SEGGER_SYSVIEW_ConfDefaults.h file, but those configurations won't work as they are. To this part I strongly recommend you to download the User Guide (page 89) provided by SEGGER to configure it properly according to the type of Cortex you're using. So, in my particular case (Cortex-M0+) these are the appropriate configurations for SEGGER_SYSVIEW_Conf.h file.
// SystemCoreClock can be used in most CMSIS compatible projects.
// In non-CMSIS projects define SYSVIEW_CPU_FREQ directly.
extern long unsigned int SystemCoreClock;

// The application name to be displayed in SystemViewer
#define SEGGER_SYSVIEW_APP_NAME        "embOS start project"

// The target device name
#define SEGGER_SYSVIEW_DEVICE_NAME     "Cortex-M0"

// Frequency of the timestamp
#define SEGGER_SYSVIEW_TIMESTAMP_FREQ  (SystemCoreClock)

// System Frequency. SystemcoreClock is used in most CMSIS compatible projects.
#define SEGGER_SYSVIEW_CPU_FREQ        (SystemCoreClock)

// Define Systick Interrupt number and name to be displayed in system view
#define SEGGER_SYSVIEW_SYSDESC0        "I#15=SysTick"

// The following define enables the start or recording inmediatly
#define SEGGER_SYSVIEW_START_ON_INIT      1
It is important to correctly indicate the CPU frequency because the function SEGGER_SYSVIEW_Conf() needs to know the Timestamp frequency to know the frequency at which time events will be recorded in your system and the CPU frequency to calculate the time that has passed between system events, because many times the events are associated with the execution of the processor. Additionally, if there are events such as interrupts or context switching between tasks, the "CPU time" calculations for those events depend directly on the CPU frequency.
Last but not least. We need to change the prebuilt library embOS is using in order to enable API Trace. So, lets modify the library and the define symbol in the makefile.
# library file
LIBF = osT6LDT
# Global symbols (#defines)
SYMBOLS = -DSTM32G0B1xx -DUSE_HAL_DRIVER -DOS_LIBMODE_DT
Test your program
Let’s test all we did with the following program running two tasks and using SEGGER_SYSVIEW_PrintfHost(). Just remember system-view is not for free, it also consume resources and those affects the amount of stack in your tasks.
#include "bsp.h"
#include "RTOS.h"
#include "SYSTEM_VIEW.h"

static int Stack1[128], Stack2[128];      // Task stacks
static OS_TASK  Task1,   Task2;           // Task control blocks

void Task_Demo1( void );  // Task routine 1
void Task_Demo2( void );  // Task routine 2

int main( void )
{
    OS_Init();      // Initialize embOS (must be first)
    HAL_Init();
    OS_InitHW();   // Initialize Hardware for embOS

    OS_TASK_CREATE(&Task1, "HP Task1", 100, Task_Demo1, Stack1);  // creating Task1 with priority of 100
    OS_TASK_CREATE(&Task2, "HP Task2", 100, Task_Demo2, Stack2);  // creating Task2 with the same priority

    OS_Start();     // Start multitasking

    return 0u;
}

void Task_Demo1( void )
{
    GPIO_InitTypeDef GPIO_InitStruct;
    __HAL_RCC_GPIOA_CLK_ENABLE( );

    GPIO_InitStruct.Mode  = GPIO_MODE_OUTPUT_PP;
    GPIO_InitStruct.Pull  = GPIO_NOPULL;
    GPIO_InitStruct.Speed = GPIO_SPEED_FREQ_HIGH;
    GPIO_InitStruct.Pin   = GPIO_PIN_5;
    HAL_GPIO_Init( GPIOA, &GPIO_InitStruct );

    for( ;; ){
        SEGGER_SYSVIEW_PrintfHost("TASK 1\n" );
        HAL_GPIO_TogglePin( GPIOA, GPIO_PIN_5 );
        HAL_Delay(1000);
    }
}

void Task_Demo2( void )
{
    GPIO_InitTypeDef GPIO_InitStruct;
    __HAL_RCC_GPIOC_CLK_ENABLE( );

    GPIO_InitStruct.Mode  = GPIO_MODE_OUTPUT_PP;
    GPIO_InitStruct.Pull  = GPIO_NOPULL;
    GPIO_InitStruct.Speed = GPIO_SPEED_FREQ_HIGH;
    GPIO_InitStruct.Pin   = GPIO_PIN_0;
    HAL_GPIO_Init( GPIOC, &GPIO_InitStruct );

    for( ;; ){
        SEGGER_SYSVIEW_PrintfHost( "TASK 2\n" );
        HAL_GPIO_TogglePin( GPIOC, GPIO_PIN_0 );
        HAL_Delay(500);
    }
}
Build and flash this program. In my case I’m using a container with the SEGGER tools (ozone and systemview). So, I’m gonna flash and run the program using ozone. Open systemview and click on the play icon (green triangle), then you can stop anytime since your program repeats always the same routines.
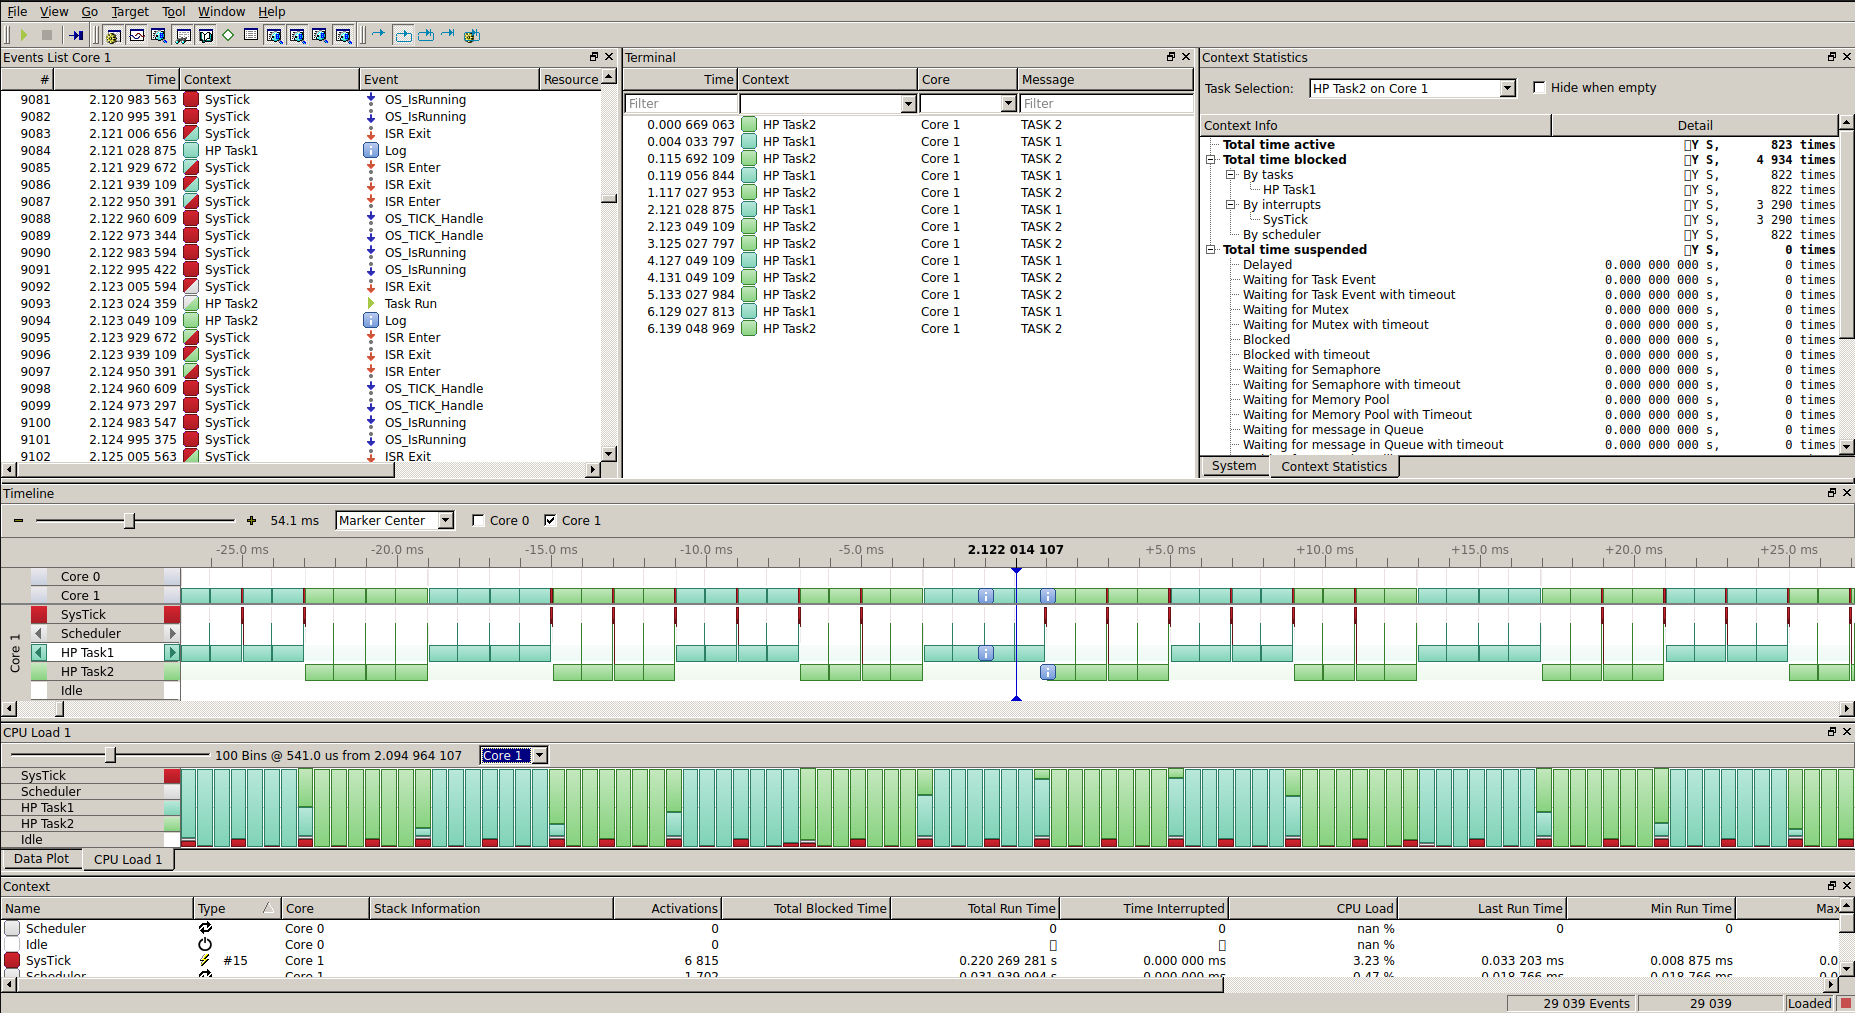
It was really simple, wasn’t it? Well, now you have embOS incorporated to your project. Play around with it creating some other tasks and watching their behavior in SystemView. and if you want to know remember we have an entire post about this wonderful tool