I’m going to show you how to incorporate FreeRTOS into your own project based on any STM32 microcontroller. It’s relatively easy and valuable to know, as you will learn about the most important files needed to later develop your project without problems. We will also see how to integrate the SEGGER SystemView, which will allow you to “see” how your tasks and RTOS resources are actually running, making it easier for you to learn how to use an operating system.
Download the latest LTS version of FreeRTOS from its official website FreeRTOS™ - FreeRTOS™ . Create a new freertos directory in the root of your template, and then create the subdirectories Inc and Src. Locate the following directories in the FreeRTOS folder you just downloaded, becuase you will need to copy certain files from there
FreeRTOS-LTS/FreeRTOS/FreeRTOS-Kernel
FreeRTOS-LTS/FreeRTOS/FreeRTOS-Kernel/include
FreeRTOS-LTS/FreeRTOS/FreeRTOS-Kernel/portable/MemMang
FreeRTOS-LTS/FreeRTOS/FreeRTOS-Kernel/portable/GCC/ARM_CM0
It is important to note that, depending on the CPU your microcontroller uses, you need to select the corresponding folder in the portable/GCC directory. For example, in my case, the microcontroller is based on the Cortex-M0+, so I need the files from the ARM_CM0 folder. Additionally, there are variations for the same CPU architecture, with support for either an MPU or FPU. For instance, if you're using the STM32F446 microcontroller, you should choose the files from the portable/GCC/CM4_MPU folder if you require MPU support. Otherwise, you should use the portable/GCC/CM4F folder.
However, this is not the only consideration. Each port may include additional files that you need to account for. Initially, there were only two primary files: port.c and portmacro.h. But, for example, the M0+ port also includes portasm.c and portasm.h. To ensure everything works properly, make sure to copy all the relevant files from the corresponding folder in the portable/GCC directory based on the port you're using.
Here’s another example: if you were using an STM32H5 with a Cortex-M33 CPU, you would need to select the files from the portable/GCC/ARM_CM33 directory.
portable/GCC/ARM_CM33
├── non_secure
│   ├── mpu_wrappers_v2_asm.c
│   ├── portasm.c
│   ├── portasm.h
│   ├── port.c
│   ├── portmacrocommon.h
│   └── portmacro.h
└── secure
    ├── secure_context.c
    ├── secure_context.h
    ├── secure_context_port.c
    ├── secure_heap.c
    ├── secure_heap.h
    ├── secure_init.c
    ├── secure_init.h
    └── secure_port_macros.h
From those folder copy and paste the following files into your own project in the same way as show below. Again keep in mind I’m using a CM0+ CPU
freertos/
├── Inc
│   ├── atomic.h
│   ├── croutine.h
│   ├── deprecated_definitions.h
│   ├── event_groups.h
│   ├── FreeRTOS.h
│   ├── list.h
│   ├── message_buffer.h
│   ├── mpu_prototypes.h
│   ├── mpu_syscall_numbers.h
│   ├── mpu_wrappers.h
│   ├── newlib-freertos.h
│   ├── picolibc-freertos.h
│   ├── portable.h
│   ├── portasm.h
│   ├── portmacro.h
│   ├── projdefs.h
│   ├── queue.h
│   ├── semphr.h
│   ├── stack_macros.h
│   ├── StackMacros.h
│   ├── stream_buffer.h
│   ├── task.h
│   └── timers.h
└── Src
    ├── croutine.c
    ├── event_groups.c
    ├── heap_1.c
    ├── heap_2.c
    ├── heap_3.c
    ├── heap_4.c
    ├── heap_5.c
    ├── list.c
    ├── mpu_wrappers_v2_asm.c
    ├── portasm.c
    ├── port.c
    ├── queue.c
    ├── stream_buffer.c
    ├── tasks.c
    └── timers.c

3 directories, 38 filesIn your Makefile, include the following line to build the FreeRTOS source code within your project. These are the minimum required files. For example, if you plan to work with queues, you should also add queue.c, and so on. It’s worth describing some of the key files:
- task.c: This is the core of FreeRTOS (along with
list.c). It contains functions to create, manage, and control the tasks you create. - list.c: This file contains a set of algorithms that support the FreeRTOS scheduler functionality.
- heap_1.c: Contains functions to manage heap memory. It can either use a statically allocated array or the heap itself, depending on which
heap_*.cfile you choose. Please refer to the FreeRTOS documentation for more details. - port.c: This file contains the interrupt routines responsible for context switching. On a Cortex-M processor, you'll find the Systick, PendSV, and SVC routines here.
- portasm.c: This file, if it exists, contains interrupt routines for PendSV and SVC interrupt vectors, along with other routines written in assembly code.
SRCS += tasks.c list.c port.c portasm.c heap_1.cAlso in the same makefile add the paths to freertos header and source files
# directories with source files to compiler (.c y .s)
SRC_PATHS  = app
SRC_PATHS += cmsisg0/startups
SRC_PATHS += halg0/Src
SRC_PATHS += freertos/Src
# directories with header files
INC_PATHS  = app
INC_PATHS += cmsisg0/core
INC_PATHS += cmsisg0/registers
INC_PATHS += halg0/Inc
INC_PATHS += freertos/Inc
FreeRTOS uses the three CPU interrupts from the Cortex-M processor that are reserved for the operating system. However, the HAL libraries also use the same interrupts. If you attempt to compile the code up to this point, the linker may complain about functions being defined more than once, depending on the port you're using. The functions in question are SVC_Handler, PendSV_Handler, and SysTick_Handler.
The reason I mention "dependence" is that on some ports, such as those for the CM3, CM4 and CM7, these functions are renamed to xPortSysTickHandler, xPortPendSVHandler, and vPortSVCHandler, respectively.
To resolve this, we need to perform a workaround that will require little modifications in the FreeRTOS source code. This can be achieved in different ways, but let's go for the easiest one. In the ints.c file, comment out the SVC_Handler and PendSV_Handler functions, and place the code shown in the SysTick_Handler function.
/* cppcheck-suppress misra-c2012-8.4 ; its external linkage is declared at HAL library */
/*void SVC_Handler( void )
{
}*/

/* cppcheck-suppress misra-c2012-8.4 ; its external linkage is declared at HAL library */
/*void PendSV_Handler( void )
{
}*/

/* cppcheck-suppress misra-c2012-8.4 ; its external linkage is declared at HAL library */
void SysTick_Handler( void )
{
    /* query if the os is running */
    if( xTaskGetSchedulerState( ) != taskSCHEDULER_NOT_STARTED )
    {
        /* service the os tick interrupt */
        xPortSysTickHandler( );
    }
    /* increment the internal tick for the hal drivers */
    HAL_IncTick( );
}
In the file port.c rename the functions Systick_Handler to xPortSysTickHandler in some cases the function already has this name, then move the prototype to portmacro.h file. On some ports the PRIVILEGED_FUNCTION qualifier does not exist.
/**
 * @brief SysTick handler.
 */
void xPortSysTickHandler( void ) PRIVILEGED_FUNCTION;
In the file FreeRTOSConfig.h place the following defines, only on those port whose functions already comes with xPortPendSVHandler and vPortSVCHandler names, like CM3, CM4 and CM7
#define xPortPendSVHandler      PendSV_Handler
#define vPortSVCHandler         SVC_Handler
In file bsp.h add the FreeRTOS headers we need so far
#include "stm32g0xx.h"
#include <stdint.h>
#include "FreeRTOS.h"
#include "task.h"
One last file is needed the FreeRTOSConfig.h, you can get this file from the FreeRTOS source but it will required some modifications, instead of, download my own minimal version,
place this file in the app/ folder of your project. Corroborate the frequency that feeds the systick timer, in the G0 family there is a divisor by 8, if your case is different modify the next define accordingly
#define configSYSTICK_CLOCK_HZ (configCPU_CLOCK_HZ / 8)Another important thing to consider in your FreeRTOSConfig.h are the following macros, which are closely related to the number of priority bits in your NVIC peripheral. For instance, below are the values I use by default with my Cortex-M0 devices. On the other hand, for the Cortex-M4, the priority bit values should be changed to 4, and the second one can go up to 15. The last one can be 1 by default (but not zero, as it may cause issues). In any case, I suggest reading the following FreeRTOS documentation for more details. You will need to modify them according to your application needs. Running the RTOS on a ARM Cortex-M Core - FreeRTOS™
#define configPRIORITY_BITS                           2
#define configLIBRARY_LOWEST_INTERRUPT_PRIORITY       3
#define configLIBRARY_MAX_SYSCALL_INTERRUPT_PRIORITY  1
Write the following code to run a single task and blink one simple and happy led, build with make and run as usual using the CLI or maybe some other debugger like cortex-debug, or eclipse. Or just flash your board using make flash
#include "bsp.h"

static void vTask( void *parameters );

int main( void )
{
    HAL_Init( );

    xTaskCreate( vTask, "Task", 128u, NULL, 1u, NULL );

    vTaskStartScheduler( );
    return 0u;
}

static void vTask( void *parameters )
{
    GPIO_InitTypeDef GPIO_InitStruct;
    __HAL_RCC_GPIOC_CLK_ENABLE( );

    GPIO_InitStruct.Mode  = GPIO_MODE_OUTPUT_PP;
    GPIO_InitStruct.Pull  = GPIO_NOPULL;
    GPIO_InitStruct.Speed = GPIO_SPEED_FREQ_HIGH;
    GPIO_InitStruct.Pin   = GPIO_PIN_0;
    HAL_GPIO_Init( GPIOC, &GPIO_InitStruct );

    for( ; ; )
    {
        HAL_GPIO_TogglePin( GPIOC, GPIO_PIN_0 );
        HAL_Delay( 1000u );
    }
}
Using SystemView
To make our work with an RTOS easier, we will use a tool called RTOS Viewer. There is a very good one from SEGGER, but it comes at a cost. We need to use a J-Link debugger, but luckily, some or most Nucleo boards can be reprogrammed to switch from ST-Link to J-Link. We already discussed SystemView in the following post; please read that carefully first, then return here.
From the SystemView source folder, copy the following files and structure a subdirectory named "systemview" in your project folder.
systemview/
├── Inc
│   ├── Global.h
│   ├── SEGGER.h
│   ├── SEGGER_RTT_Conf.h
│   ├── SEGGER_RTT.h
│   ├── SEGGER_SYSVIEW_ConfDefaults.h
│   ├── SEGGER_SYSVIEW_Conf.h
│   ├── SEGGER_SYSVIEW_FreeRTOS.h
│   ├── SEGGER_SYSVIEW.h
│   └── SEGGER_SYSVIEW_Int.h
└── Src
    ├── SEGGER_RTT_ASM_ARMv7M.S
    ├── SEGGER_RTT.c
    ├── SEGGER_RTT_printf.c
    ├── SEGGER_RTT_Syscalls_GCC.c
    ├── SEGGER_SYSVIEW.c
    ├── SEGGER_SYSVIEW_Config_FreeRTOS.c
    ├── SEGGER_SYSVIEW_Config_FreeRTOS_CM0.c
    ├── SEGGER_SYSVIEW_Config_NoOS.c
    ├── SEGGER_SYSVIEW_Config_NoOS_CM0.c
    └── SEGGER_SYSVIEW_FreeRTOS.c

3 directories, 18 files
You won't find the SEGGER_SYSVIEW_Config_FreeRTOS_CM0.c file because it is not included with the SystemView sources. We created this file specifically for Cortex-M0/M0+ devices, and it can be downloaded from here. If you are not using a device with one of those CPUs, you do not need it.
Add the following files to the makefile. But replace SEGGER_SYSVIEW_Config_FreeRTOS_CM0.c file for the SEGGER_SYSVIEW_FreeRTOS.cfor none M0/M0+ devices and also add SEGGER_RTT_ASM_ARMv7M.S
SRCS += SEGGER_RTT.c SEGGER_RTT_printf.c SEGGER_SYSVIEW.c SEGGER_SYSVIEW_FreeRTOS.c SEGGER_SYSVIEW_Config_FreeRTOS_CM0.c At file FreeRTOSConfig.h make sure the following macros are set to 1 and add the include to SEGGER_SYSVIEW_FreeRTOS.hright at the end of the file, but before the #endif
#define INCLUDE_xTaskGetIdleTaskHandle         1
#define INCLUDE_pxTaskGetStackStart            1

#include "SEGGER_SYSVIEW_FreeRTOS.h"
Only for Cortex M0/M0+
In file ints.c look fort he SysTick_Handler and add the increment to SEGGER_SYSVIEW_TickCnt++; variable ( only applicable for M0/M0+ devices )
void SysTick_Handler( void )
{
    /*Increment the SystemView tick counter*/
    SEGGER_SYSVIEW_TickCnt++;
    /* query if the os is running */
    if( xTaskGetSchedulerState( ) != taskSCHEDULER_NOT_STARTED )
    {
        /* service the os tick interrupt */
        xPortSysTickHandler( );
    }
    /* increment the internal tick for the hal drivers */
    HAL_IncTick( );
}
For some reason we need to raise the CPU frequency beyond the default one in some CPUs otherwise you program will trow you a Hard Fault ( after reading the official docs, it still unclear why ), but you can do this by placing the following code in the function HAL_MspInit from the msps.c file. The code down below is applicable for the stm32g0b1 that I’m using, you need to see how to achieve the same for your particular part number.
void HAL_MspInit( void )
{
    RCC_OscInitTypeDef RCC_OscInitStruct = { 0 };
    RCC_ClkInitTypeDef RCC_ClkInitStruct = { 0 };

    __HAL_RCC_SYSCFG_CLK_ENABLE( );
    __HAL_RCC_PWR_CLK_ENABLE( );

    /** Configure the main internal regulator output voltage*/
    HAL_PWREx_ControlVoltageScaling( PWR_REGULATOR_VOLTAGE_SCALE1 );

    /* Initializes the RCC Oscillators according to the specified parameters in
    the RCC_OscInitTypeDef structure The frequency set is 64MHz with the internal
    16MHz HSI oscilator. According to the formulas:
    fVCO = fPLLIN x ( N / M ) = 16MHz x (8 / 1) = 128MHz
    fPLLP = fVCO / P = 128MHz / 2 = 64MHz
    fPLLQ = fVCO / Q = 128MHz / 2 = 64MHz fPLLR = fVCO / R = 128MHz / 2 = 64MHz
    */
    RCC_OscInitStruct.OscillatorType      = RCC_OSCILLATORTYPE_HSI;
    RCC_OscInitStruct.HSIState            = RCC_HSI_ON;
    RCC_OscInitStruct.HSIDiv              = RCC_HSI_DIV1;
    RCC_OscInitStruct.HSICalibrationValue = RCC_HSICALIBRATION_DEFAULT;
    RCC_OscInitStruct.PLL.PLLState        = RCC_PLL_ON;
    RCC_OscInitStruct.PLL.PLLSource       = RCC_PLLSOURCE_HSI;
    RCC_OscInitStruct.PLL.PLLM            = RCC_PLLM_DIV1;
    RCC_OscInitStruct.PLL.PLLN            = 8;
    RCC_OscInitStruct.PLL.PLLP            = RCC_PLLP_DIV2;
    RCC_OscInitStruct.PLL.PLLQ            = RCC_PLLQ_DIV2;
    RCC_OscInitStruct.PLL.PLLR            = RCC_PLLR_DIV2;
    HAL_RCC_OscConfig( &RCC_OscInitStruct );

    /** Initializes the CPU, AHB and APB buses clocks*/
    RCC_ClkInitStruct.ClockType      = RCC_CLOCKTYPE_HCLK | RCC_CLOCKTYPE_SYSCLK | RCC_CLOCKTYPE_PCLK1;
    RCC_ClkInitStruct.SYSCLKSource   = RCC_SYSCLKSOURCE_PLLCLK;
    RCC_ClkInitStruct.AHBCLKDivider  = RCC_SYSCLK_DIV1;
    RCC_ClkInitStruct.APB1CLKDivider = RCC_HCLK_DIV1;
    HAL_RCC_ClockConfig( &RCC_ClkInitStruct, FLASH_LATENCY_2 );
}
Test you program
Replace the previous code with the following one running two tasks and using the SEGGER_SYSVIEW_PrintfHost. You need to be careful with this function, because eat stack in a serious way. Well in general remember system-view is not for free, it also consume resources and those affects the amount of stack in your tasks.
#include "app_bsp.h"
#include "SEGGER_SYSVIEW.h"

static void vTask1( void *parameters );
static void vTask2( void *parameters );

int main( void )
{
    HAL_Init( );
    /*enable RTT and system view*/
    SEGGER_SYSVIEW_Conf( );

    xTaskCreate( vTask1, "Task1", 256u, NULL, 1u, NULL );
    xTaskCreate( vTask2, "Task2", 256u, NULL, 1u, NULL );

    vTaskStartScheduler( );
    return 0u;
}

static void vTask1( void *parameters )
{
    GPIO_InitTypeDef GPIO_InitStruct;
    __HAL_RCC_GPIOC_CLK_ENABLE( );

    GPIO_InitStruct.Mode  = GPIO_MODE_OUTPUT_PP;
    GPIO_InitStruct.Pull  = GPIO_NOPULL;
    GPIO_InitStruct.Speed = GPIO_SPEED_FREQ_HIGH;
    GPIO_InitStruct.Pin   = GPIO_PIN_0;
    HAL_GPIO_Init( GPIOC, &GPIO_InitStruct );

    for( ; ; )
    {
        HAL_GPIO_TogglePin( GPIOC, GPIO_PIN_0 );
        /*With this printf version the string will be displayed in SystemView*/
        SEGGER_SYSVIEW_PrintfHost("Tare1 Hola mundo de SEGGER");
        HAL_Delay( 1000u );
    }
}

static void vTask2( void *parameters )
{
    GPIO_InitTypeDef GPIO_InitStruct;
    __HAL_RCC_GPIOC_CLK_ENABLE( );

    GPIO_InitStruct.Mode  = GPIO_MODE_OUTPUT_PP;
    GPIO_InitStruct.Pull  = GPIO_NOPULL;
    GPIO_InitStruct.Speed = GPIO_SPEED_FREQ_HIGH;
    GPIO_InitStruct.Pin   = GPIO_PIN_1;
    HAL_GPIO_Init( GPIOC, &GPIO_InitStruct );

    for( ; ; )
    {
        HAL_GPIO_TogglePin( GPIOC, GPIO_PIN_1 );
        /*With this printf version the string will be displayed in SystemView*/
        SEGGER_SYSVIEW_PrintfHost("Tare2 Hola mundo de SEGGER");
        HAL_Delay( 2000u );
    }
}
Once your program is running with using the CLI or the VSCode cortex-debug (or any other debugger), open systemview and click on the play icon (green triangle), then you can stop anytime since your program repeats always the same routines. You’ll see the task running and been switching in and out, the scheduler running, log events and messages printed, besides the CPU usage of each task.
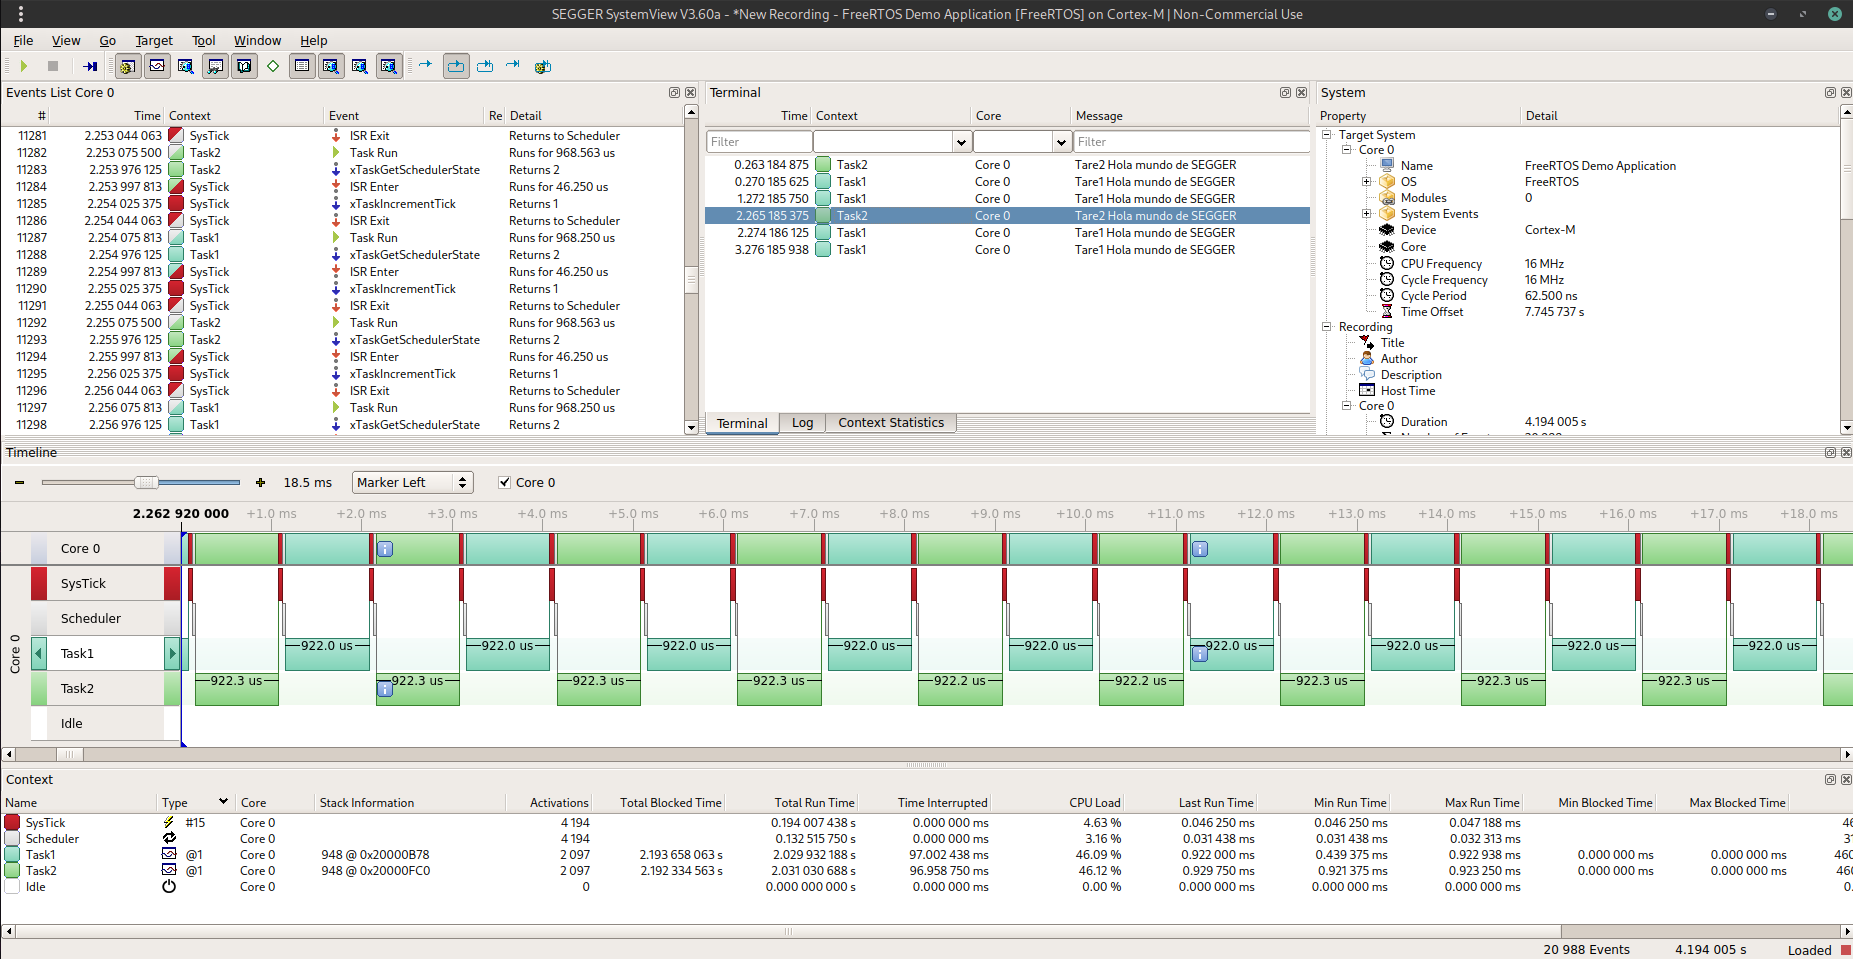
It was really simple, wasn’t it? Well, try playing around with SystemView a little before moving on to something more serious. Continue working through the rest of the FreeRTOS material to test and improve your skills. By the way, if your board doesn't support switching to J-Link, don’t worry—there’s hope! You can use Percepio to visualize your program's execution. Getting Started with Percepio View on FreeRTOS