Did you know documentation is important?, the hell it is. It can be boring sometimes, that’s for sure but there is an interesting option to extract the same documentation from the comments source code, and it is called Doxygen, This program will extract certain comments formatted with tokens, and then it will place those comments in an HTML format.
To install doxygen
Linux
$ sudo pacman -Syu doxygenWindows
$ choco install doxygen.installAdd doxygen to path variable
$ $addPath = 'C:\Program Files\doxygen\bin'You can read the official documentation using the following link https://www.doxygen.nl/manual/docblocks.html. We gonna try to help you to start right away with the following quick guide, besides our template already come wit a pre-configured doxyfile
Doxygen uses a config file named .doxyfile, but there is no need to config Doxygen, it is already done for you. However it is necessary to modify the project title and a provide a short description. Just look for the following fields in the .doxyfile that comes in our template. More configuration options down below
# The PROJECT_NAME tag is a single word (or a sequence of words surrounded by
# double-quotes, unless you are using Doxywizard) that should identify the
# project for which the documentation is generated. This name is used in the
# title of most generated pages and in a few other places.
# The default value is: My Project.

PROJECT_NAME           = "Template-G0"

# The PROJECT_NUMBER tag can be used to enter a project or revision number. This
# could be handy for archiving the generated documentation or if some version
# control system is used.

PROJECT_NUMBER         = 0.0.1

# Using the PROJECT_BRIEF tag one can provide an optional one line description
# for a project that appears at the top of each page and should give viewer a
# quick idea about the purpose of the project. Keep the description short.

PROJECT_BRIEF          = Template with alreadys etup STM32CubeG0 HAL library.
The following paragraph will illustrate how we recommend to document your code using what is called doxygen header, basically a set of comment tokens use to be recognized by doxygen and be extracted property. You will encounter things like surrounded by <>, example: * @param <param name>[in] Parameer description based on what does, it means you have to replace this part for your own name without the <> symbols, like this /* @param Temperature[in] Value to be converted to F degrees
Project main page
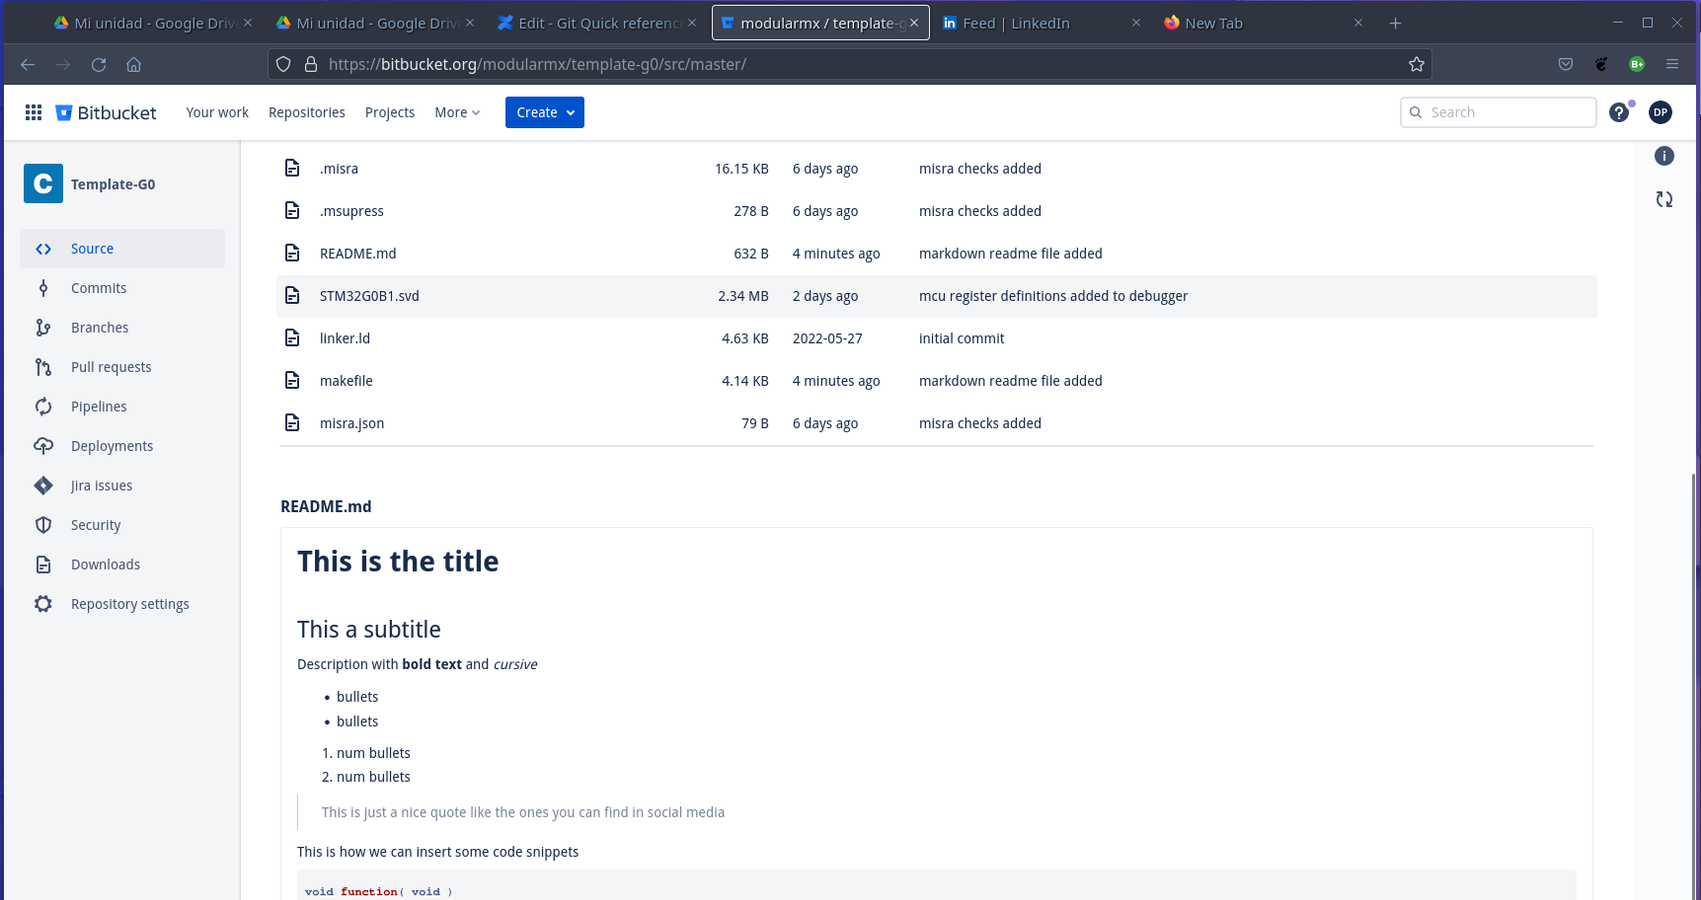
It is necessary to add a front page to describe the details of your wonderful project, and we are going to do that using Markdown notation, which is a no brain task to learn. the template in its latest version already comes with a README.md file with some examples of markdown, just modify this file and place here the project description ( the tag {#mainpage} is mandatory to doxygen to recognize this file ).
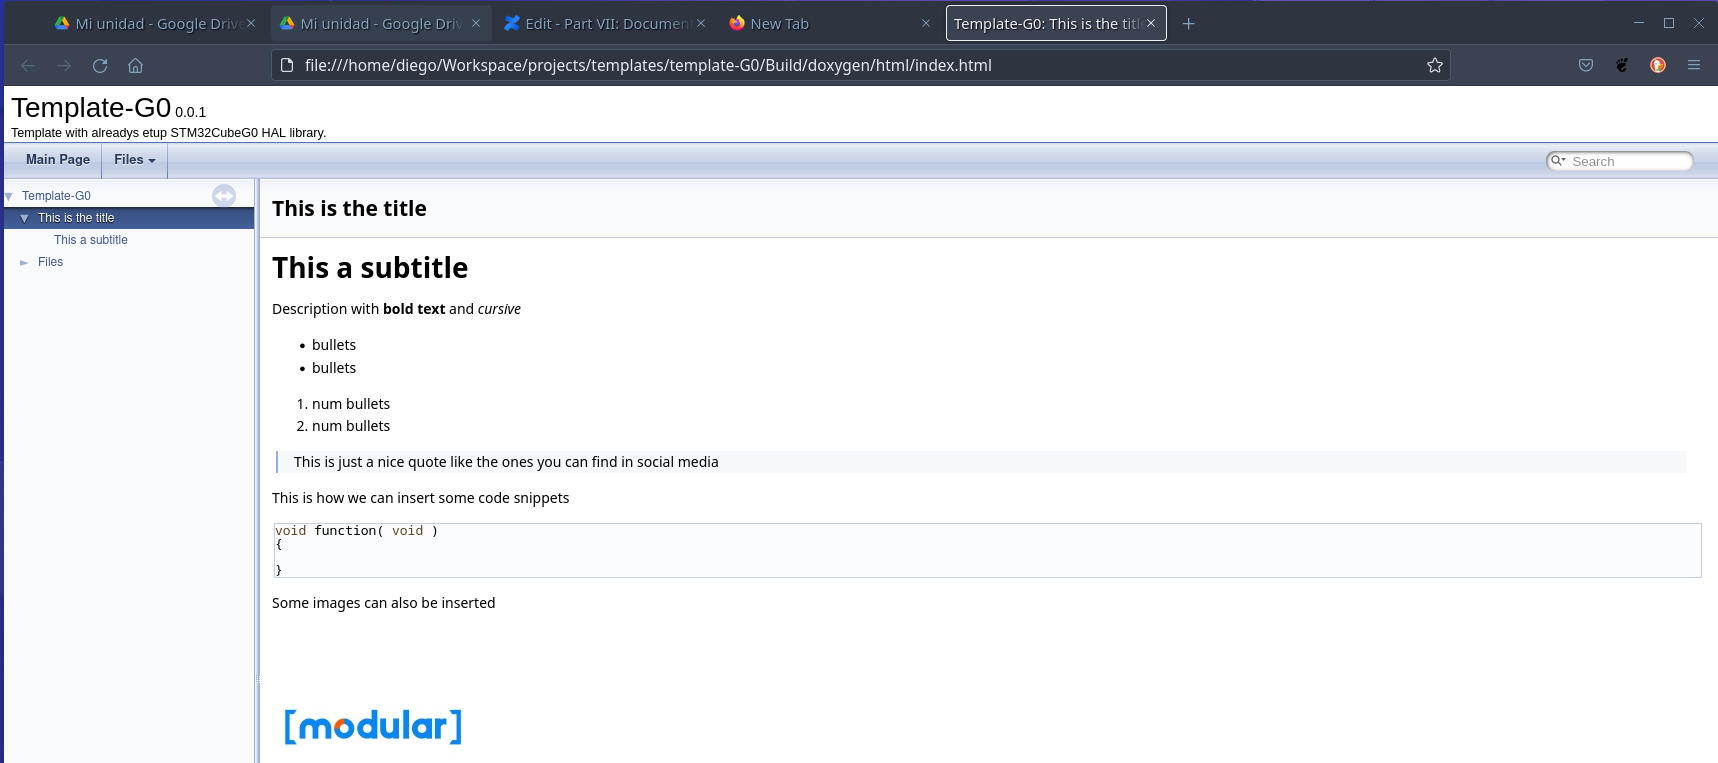
The best thing at all is that any remote repository system like Bitbucket, Gitlab or Github will recognize this readme file and it will render it as the front page for your repository. I recommend taking a look at some projects who has wonderful readme files to see what you can do with them, this is an example.
File headers
Document each source file in your application project with the following Doxygen header. headers (.h) files also need this header, but in the case of acting as an interface for a source file, duplicate the information but replace the name of the file with the proper sufix ( file.h or file.c )
/**
 * @file    <file name>
 * @brief   **brief file description (just one line)**
 *
 * Write a detail description of your driver, what it does and how and how to work with its interfaces
 * Use as many lines as you need
 *
 * @note    If there is something that needs to be take into account beyond its normal
 *          utilization, write right here
 */
Function Documentation
Every function from each file should have the following description header, it is mandatory to provide a parameter description, we can avoid parameter description if the function does not receive any parameter, however, if the function reads a global variable then this will be an input parameter, and if writes to a global variable then is an output parameter. Same thing apply for any the returned values
/**
 * @brief   **Provide a brief fucntion description (just one line)**
 *
 * Provide the proper and detailed description for your function, you can use as many
 * lines as you want but keep each line less than 100 characteres
 *
 * @param   <param name>[in] Parameer description based on what does
 * @param   <param name>[out] add one line per paramter and indicates if input or output
 *
 * @retval  Describe the return value and its potential values,
 *          if void type None
 *
 * @note This is optional, just in case something very special needs to be take into account
 */
 static void funct( void )
 {
    ...
 }
Global variables
Every global variable should be provided with its proper brief description, there is no need for a detailed one, but if it is necessary this can also be provided just like in functions
/**
 * @brief  Provide a brief fucntion description (just one line)
 */
static uint32_t var;
Structure or Unions definitions
To document structures just add a brief description of one or more lines and then describe each of its elements. The same method can be used to document enums and/or unions
/**
  * @brief   Brief structure description
  */
typedef struct _STR_TypeDef
{
    uint32_t element1;       /*!< provide description for this element */
    uint32_t element2;       /*!< provide description for this element.
                                  More than one line can be used */
} STR_TypeDef;
Defines groups
To document any define statement that replaces magic numbers, it has to be in groups using the doxygen keyword defgroup and then just like structs we need to document each of its defines statements
/**
  * @defgroup <group name> brief description
  @{ */
#define DEFINE_1                 0x0001  /*!< Brief description */
#define DEFINE_2                 0x0002  /*!< Brief description */
/**
  @} */
Running Doxygen
To generate the documentation in html format type in the terminal,
$ doxygen .doxyfileBut if you are using our template there is a make target for that. Besides generating the documentation it will open the page using Firefox web browser (in case windows you shall place firefox in the PATH variable), The file can be opened manually from this location Build/doxygen/html/index.html
#---Genrete project documentation with doxygen-----------------------------------------------------
docs :
	doxygen .doxyfile
#	firefox Build/doxygen/html/index.html
More Doxygen configuration options
Doxygen has like a zillion options to configure, i choose what i consider so far the most important one to modify and or make a quick setup according to your needs, feel free to take the doxyfile we provide a starting point.
Choose where the HTML output from doxygen will be place
# The OUTPUT_DIRECTORY tag is used to specify the (relative or absolute) path
# into which the generated documentation will be written. If a relative path is
# entered, it will be relative to the location where doxygen was started. If
# left blank the current directory will be used.

OUTPUT_DIRECTORY       = Build/doxygen
If you already know and love markdown then this option is for you
# If the MARKDOWN_SUPPORT tag is enabled then doxygen pre-processes all comments
# according to the Markdown format, which allows for more readable
# documentation. See https://daringfireball.net/projects/markdown/ for details.
# The output of markdown processing is further processed by doxygen, so you can
# mix doxygen, HTML, and XML commands with Markdown formatting. Disable only in
# case of backward compatibilities issues.
# The default value is: YES.

MARKDOWN_SUPPORT       = YES
The warning options, very important if you want to catch any miss documented element, and if you want to stop the document generation when there are warnings. Strongly recommend
WARNINGS               = YES

# If the WARN_IF_UNDOCUMENTED tag is set to YES then doxygen will generate
# warnings for undocumented members. If EXTRACT_ALL is set to YES then this flag
# will automatically be disabled.
# The default value is: YES.

...

# If the WARN_AS_ERROR tag is set to YES then doxygen will immediately stop when
# a warning is encountered. If the WARN_AS_ERROR tag is set to FAIL_ON_WARNINGS
# then doxygen will continue running as if WARN_AS_ERROR tag is set to NO, but
# at the end of the doxygen process doxygen will return with a non-zero status.
# Possible values are: NO, YES and FAIL_ON_WARNINGS.
# The default value is: NO.

WARN_AS_ERROR          = YES
Directories where the source files doxygen will process for documentation, you can files too separated by a single space
# The INPUT tag is used to specify the files and/or directories that contain
# documented source files. You may enter file names like myfile.cpp or
# directories like /usr/src/myproject. Separate the files or directories with
# spaces. See also FILE_PATTERNS and EXTENSION_MAPPING
# Note: If this tag is empty the current directory is searched.

INPUT                  = app README.md
If there is a specific file doxygen should avoid in the directories set in INPUT option
# The EXCLUDE tag can be used to specify files and/or directories that should be
# excluded from the INPUT source files. This way you can easily exclude a
# subdirectory from a directory tree whose root is specified with the INPUT tag.
#
# Note that relative paths are relative to the directory from which doxygen is
# run.

EXCLUDE                = app/stm32g0xx_hal_conf.h