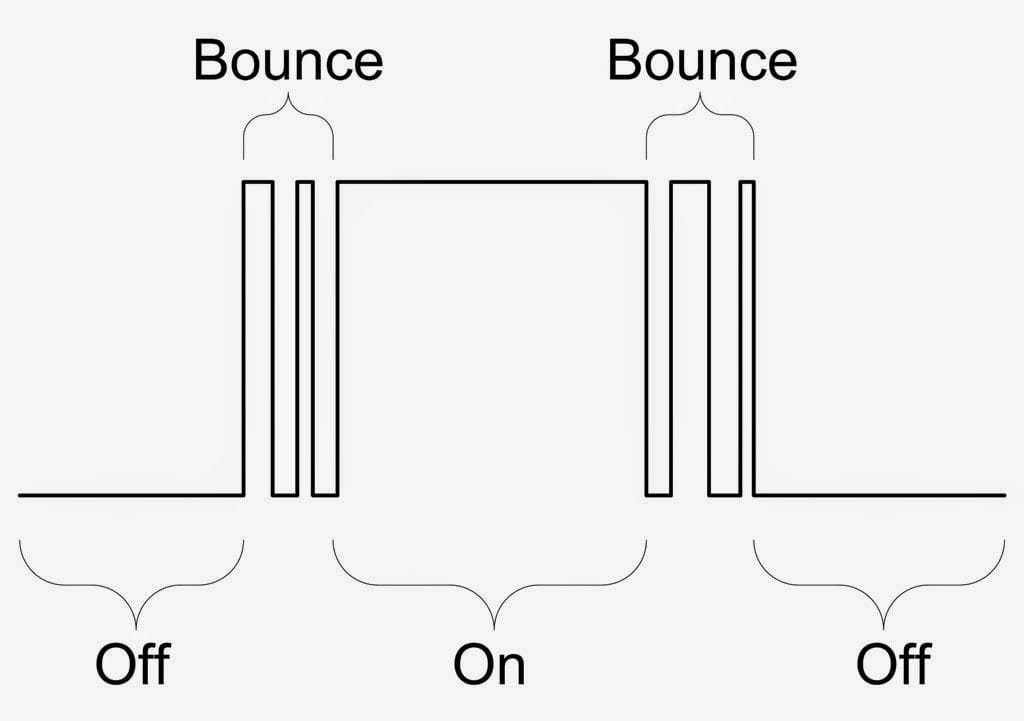
You should not underestimate the code necessary to control effectively a mechanical button, trust me it has its own amount of complexity. I’m not going to start explaining the effects of a mechanical press in a button neither talk about the bouncing effect, you should know by now. Well, ok, when you press and release a button this is actually what happens. the image below shows a single press and release but the mechanical; bouncing actually cause the microcontroller to detect several times an activation, how many, we don’t know and we don not care.
The best way to face this problem is considering the button as a sensor that needs to be sample with a certain frequency, like any signal we try to digital reconstruct with the pin of our microcontroller. Let's choose a 50ms because is quiet enough to detect any activation without losing information ( your fingers are not that fast my friend ).
Suppose our button when press send a LOW signal to the microcontroller pin, the code below will flip a led every time is detected a low level every 50ms. actually, you will see a flashy led
int main( void )
{
    while(1)
    {
        delay_ms( 50 );
        /* sample the button */
        if( read_pin(0) == LOW )
        {
            flip_a_led();
        }
    }
}
Ok we don’t want a blinky led, what we want is to detect the moment when a button has been pressed, and then take an action, but only at the first moment, to solve this issue we need to use some flags to indicate the first press and the eventual release.
/* sample the button and detect a press */
if( (read_pin(0) == LOW) && (press_flag == FALSE) )
{
    /*indicate the first press and ignore the following status
    if not has been change*/
    press_flag = TRUE;
    flip_a_led();
}

/* sample the button and detect a release*/
if( (read_pin(0) == HIGH) && (press_flag == TRUE) )
{
    /*indicate the first press and ignore the following status
    if not has been change*/
    press_flag = FALSE;
}
The code above is good enough but is not recommended to ask for a release almost immediately after asking for a press, some slippery bouncing signal could be present. Let's use a two-state state machine that allow us to perform the task in two different times and encapsulate the logic in a function.
uint8_t get_button( uint8_t pin )
{
    static uint8_t state = PRESS;
    uint8_t status = IDLE;

    switch(state)
    {
        /*ask if the button is pressed*/
        case PRESS:
            if( (read_pin(pin) == LOW)
            {
                status = PRESSED;
                state = RELEASE;
            }
        break;
        /*as if the button has been released after been pressed*/
        case RELEASE;
            if( (read_pin(pin) == HIGH)
            {
                state = PRESS;
                status = RELEASED;
            }
        break
    }
    /*return if IDLE, PRESS or RELEASE*/
    return status;
}

...

/*at some point in the code we can call the function and ask
if the button was presseed or even release*/
if( get_time() == 50 )
{
    btn = get_button( 0 );
    ...

}

/*at some other point in the code we can ask for the button status*/
if( btn == PRESSED )
{
    ...
}
There is still room for improvements we are not sure if the moment we sample the pin is an actual activation or just a bounce, remember this little pesky one only takes microseconds. There are several approaches we can use, like sampling several times a then decide if it was a valid activation or after the first one to sample again 100ms (more or less) and then corroborate if the button is still press or release. Let’s take the second one
uint8_t get_button( void )
{
    static uint8_t state = PRESS;
    uint8_t status = IDLE;

    switch(state)
    {
        /*ask if the button is pressed*/
        case ST_IDLE:
            if( read_pin(0) == LOW)
            {
                state = ST_PRESS;
                timeout = 0; /*start the counter for 100ms*/
            }
        break;

        case ST_PRESS:
          /*increase counter, each unit is the equivalent to 25ms*/
          timeout++;
          /*Ask if the button was release after the timeout*/
          if( read_pin(0) == HIGH)
          {
              /*it was a spurios detection, ignore and get back idle*/
              state = ST_IDLE;
          }
          /*ask if 100ms has been pass*/
          if( counter >= 4)
          {
              /*if so, an actual press action is detected*/
              status = PRESSED;
              state = ST_HOLD;
          }
        break;
        /*as if the button has been released after been pressed*/
        case ST_HOLD;
            if( read_pin(0) == HIGH)
            {
                state = ST_RELEASE;
                timeout = 0; /*start the counter for 100ms*/
            }
        break
        case  ST_RELEASE:
            /*increase counter, each unit is the equivalent to 25ms*/
            timeout++;
            /*Ask if the button was release after the timeout*/
            if( read_pin(0) == LOW)
            {
                /*it was a spurios detection, ignore and get back release detection*/
                state = ST_RELEASE;
            }
            /*ask if 100ms has been pass*/
            if( counter >= 4)
            {
                /*if so, an actual release action is detected*/
                status = PRESSED;
                state = ST_IDLE;
            }
        break;
    }
    /*return if IDLE, PRESS or RELEASE*/
    return status;
}
Now we are talking, maybe you can think is too much for a button detection, but remember we are trying to build a robust algorithm, in case you want something simple the first code example is more than fine, but for a more robust approach the last one is the way to go with no doubt. Keep reading because the next step will be to create a complete reusable code to manage any number of buttons.
Buttons Manager Driver
We learn a good way to easily and feasible manage our mechanical buttons, now let’s take everything we learned further and assemble a piece of reusable code that will allows us to control any number of buttons, set the periodicity of the sampling, activation levels and the amount of time required to detect an activation. Create to files Buttons.h and Buttons.c and define the following structures and prototypes.
- Create a control structure with the necessary elements to control the button driver
typedef struct _KeyboardType
{
    uint8_t Buttons;    /*the number of buttons to handle*/
    uint8_t Sample;     /*the number of samples necesesary to detect an activation*/
    uint8_t Counter;    /*counter for the nmber of bttons registered*/
    ButtonType *BtnBuffer; /*pointer*/
} KeyboardType;- Control structure describe each button characteristics
typedef struct _ButtonType
{
    uint8_t Pin;      /*Pin where the button is connected*/
    uint8_t Port;     /*Port where the pin is connected if applicable*/
    uint8_t Counter;  /*Counter for the number of samples required*/
    uint8_t Event;    /*store the event, PRESS, RELEASE or IDLE*/
    uint8_t Status;   /*Button status, ACTIVE, INACTIVE*/
    uint8_t ActiveLevel; /*Active level of the button*/
    uint8_t smState;  /*Internal State machine for the button*/
} ButtonType;- Enumeration with the constant definitions for the events to report
typedef enum _BtnStatus
{
    BTN_IDLE = 0,   /*No event*/
    BTN_PRESSED,    /*button has been pressed*/
    BTN_RELEASED    /*button has been released*/
} BtnEvents;- Define to report button statuses
#define BTN_INACTIVE  0
#define BTN_ACTIVE 1- Function to Initialize everything that is required like hardware or the variables in each structure to its corresponding values
void Buttons_Init( const KeyboardType *Buttons, uint8_t NButtons, uint8_t Samples, ButtonType *Buffer );The function should set the values of the main function period, how many time the main function execution are necessary to determine the button state and set the memory space where each button control structure is stored, user must declare in application layer an array of type ButtonType with the number of elements according to number of buttons to manage.
- Register the pin where the mechanical button will be connected
uint8_t Buttons_Register( const KeyboardType *Buttons, uint8_t Pin, uint8_t Port, uint8_t ActiveLevel );The function shall register in the ButtonType structure the port, pin and the activation level bot the mechanical button to use, it is up to the user to define the values and data types accepted for the three parameters the uint8_t type is only for demonstration purposes. For instance, if the micro in use is a stm32go with the HAL library maybe you can use an uint16_t for the pin and a GPIO_TypeDef for the port types
- Return the button status, ACTIVE, or INACTIVE
uint8_t Buttons_GetStatus( const KeyboardType *Buttons, uint8_t Button );The driver does not distinguish between between LOW or HIGH but if the button is pressed or not, if is pressed then we say the button is ACTIVE. This detection is performed by the state machine inside the MainFunction, this function is only in charge of returning the value detected.
- Return the last event detected BTN_IDLE, BTN_PRESSED or BTN_RELEASED
uint8_t Buttons_GetEvent( const KeyboardType *Buttons, uint8_t Button );The function shall return the last event detected by the MainFunction state machine, where the values to return correspond to BtnEvents enum, the function shall also clear the last status reported, meaning if we call the function again and the state machine has not detected another event then and IDLE shall be returned
- This is where the state machine shall be implemented, and where all the buttons event detection will happen
void Buttons_MainFunction( const KeyboardType *Buttons );Basically, the state machine from the last code example is what you need to implement in here but this time all the variables need shall be taken from the structures KeyboardType and ButtonType , just remember ButtonType is an array where each element is a button, and the array is pointed by the KeyboardType.BtnBuffer element
Here is an example of how to use our new and fancy button driver manager
#include "Buttons.h"

#define MAX_BTNS 2

KeyboardType MyBtns;
ButtonType Btns[ MAX_BTNS ];

...

Buttons_Init( &MyBtns, MAX_BTNS, 2, &Btns );
Button = Buttons_Register( &MyBtns, PORTA, PIN_2, LOW );

...

if( Tick() >= _50ms )
{
    Buttons_MainFunction( &MyBtns );
}

...

if( Buttons_GetEvent( &MyBtns, Button ) == BTN_PRESSED )
{
    ...
}
But if you already have the scheduler
#include <stdio.h>
#include "Scheduler.h"
#include "Buttons.h"

#define TASKS_N     2
#define TICK_VAL    10

static TaskType tasks[ TASKS_N ];
static SchedulerType Sche;

#define MAX_BTNS 2

KeyboardType MyBtns;
ButtonType Btns[ MAX_BTNS ];
uint8_t Button;

void Init_50ms(void);
void Task_50ms(void);
void Task_100ms(void);

int main( void )
{
    unsigned char TaskID1;
    unsigned char TaskID2;

    /*init the scheduler with two tasks and a tick time of 10ms and run for 10 seconds only*/
    Scheduler_InitScheduler( &Sche, TICK_VAL, TASKS_N, &tasks );

    /*register two task with thier corresponding init fucntions and their periodicyt, 100ms and 500ms*/
    TaskID1 = Scheduler_RegisterTask( &Sche, Init_50ms, Task_50ms, 50 );
    TaskID2 = Scheduler_RegisterTask( &Sche, NULL, Task_100ms, 100 );

    /*run the scheduler forever*/
    Scheduler_MainFunction( &Sche );

    return 0;
}

void Init_50ms(void)
{
    /*Set our button manager to be polled each 50ms and events detected each 100ms*/
    Buttons_Init( &MyBtns, MAX_BTNS, 2, &Btns );
    /*Register one single button on PORT A.2 and active in LOW level*/
    Button = Buttons_Register( &MyBtns, PORTA, PIN_2, LOW );
}

void Task_50ms(void)
{
    /*poll the button periodic task*/
    Buttons_MainFunction( &MyBtns );
}

void Task_100ms(void)
{
    /*Ask if the button regitered has been pressed*/
    if( Buttons_GetEvent( &MyBtns, Button ) == BTN_PRESSED )
    {
        ...
    }
}
You can find here our own buttons implementation, the purpose of the code it is only to be taken as reference to clarify your potential doubts, but we encourage you to write your own implementation
- Buttons reference code
Code Snippets
Exercises
- Recall the exercises from the STM32G0 training; let's revisit them, but this time, implement them using your new and advanced button manager algorithm. You may choose to use the scheduler and queues or not.
- If you're up for the challenge, using the same methodology, create a piece of code that can detect the following mouse events: a single click, a double click, and a click-and-hold. Utilize a time threshold of 300 or 400 milliseconds to determine which event occurred.